


PATCH: May 28 – Crafting Queues and Bug Fixes
05 / 28 / 2021Ability / Buff Timers
- Fixed an issue related to last patch’s updates to timers that was causing a number of effects (such as Bleed, Disease, Stat Buffs, etc) to not resolve over the correct duration
Societies
- Players will no longer earn society job progress for creatures in Urukton Bluffs (players were earning progress towards “Otyugh” society jobs for killing Thruggs, which use a similar base code to Otyughs)
Recycling
- Fixed an issue where Magic Slayer Wands would sometimes not be recycleable via crafting or a Magic Item Recycler container
- Fixed an issue where Blacksmithing/Carpentry/Inscription/Tailoring Repair Kits would sometimes not be recyclable
House Placement
- Fixed an issue where players were able to circumvent the cooldown on house placement during IDOCs
- If a player attempts to place a house while a post-collapse IDOC timer is stilll active, they will be delayed from making further placement attempts for 30 seconds
Stygian Rifts
- Murderers should now be able to use the Arena Stablemaster for 10 minutes after a Stygian Rifts event ends
Cooking
- The Cooking Stove (Antiquity) should now count as a heat source for cooking
Creature Abilities
- Tamed Colossal Swamp Slug, Giant Swamp Slug, Flame Purger, and Corpse Purger’s ranged attacks, when made against players, will have their damage delay reduced in half and will play animations much faster (the old delay in damage was causing some issues with PvP damage thresholds)
- The Volt Wisp Shock ability should now still do damage to players even they are currently in the middle of a Hamstring cooldown
- Fixed several graphics on Corpse Purgers and Swamp Slugs ranged attacks that were causing potential movement issues with ships
—————————————
Crafting Queues
Players now have access to “Crafting Queues” which are automation tools for crafting
Launching the Crafting Queue Menu
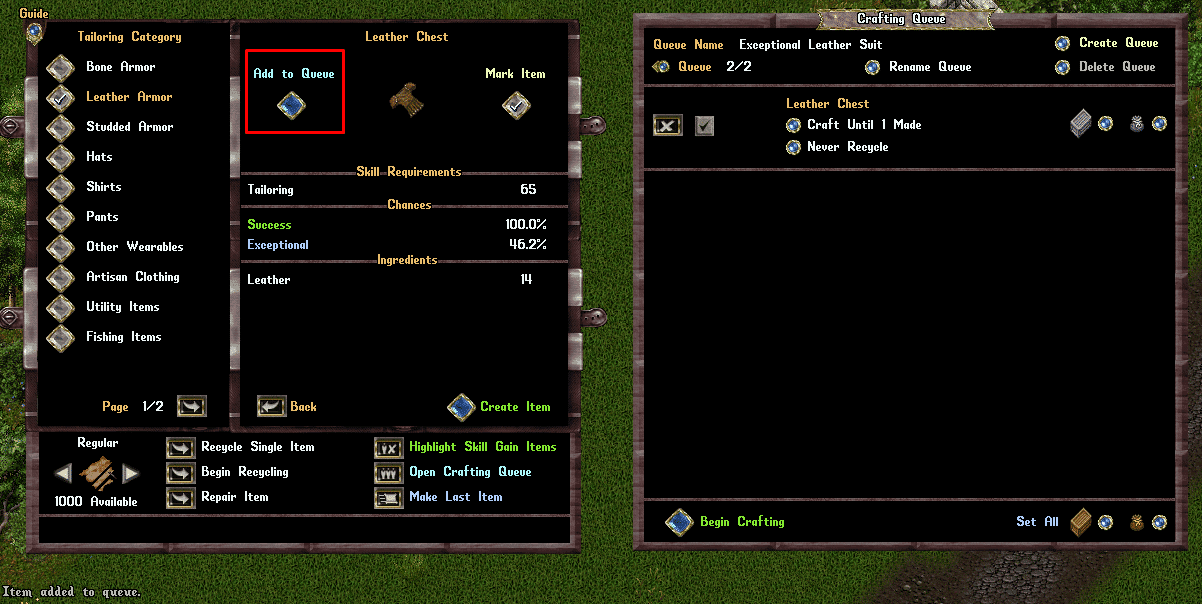
- Players can launch the Crafting Queue Menu by clicking the “Open Crafting Queue” button in any crafting menu
- Additionally, players can type [CraftingQueue or [CraftQueue to launch the Crafting Queue Menu
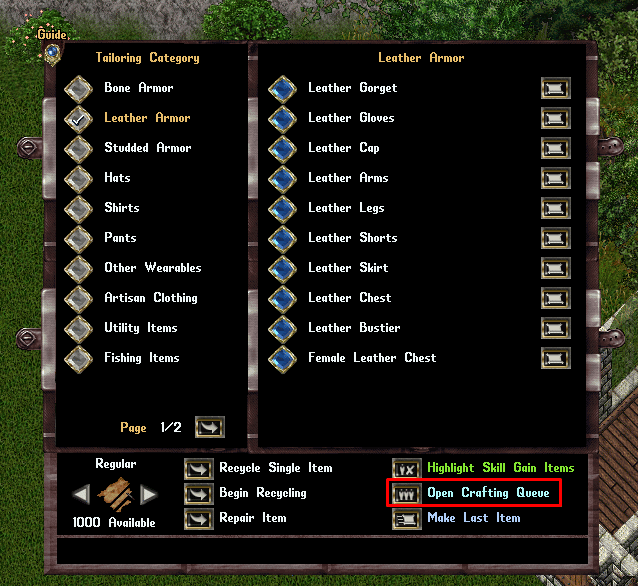
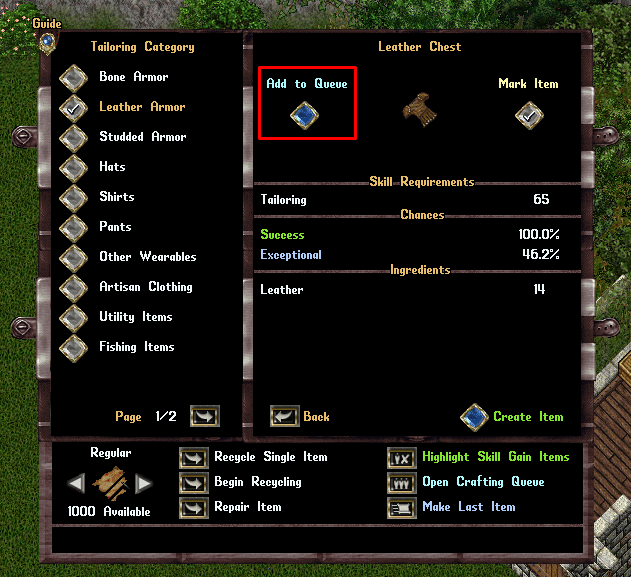
- Additionally, if a player clicks “Add to Queue” in the crafting sub-menu for a specific item, it will automatically launch the Crafting Queue Menu and add that specific item to the player’s current Crafting Queue (or will create a new Crafting Queue if none exists yet)
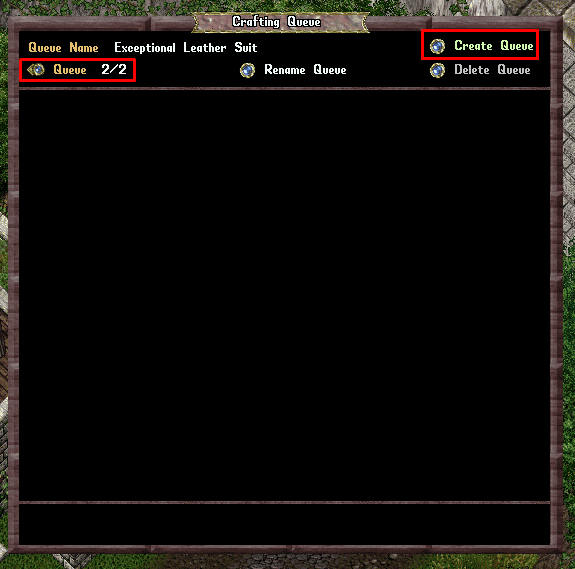
Crafting Queue Menu
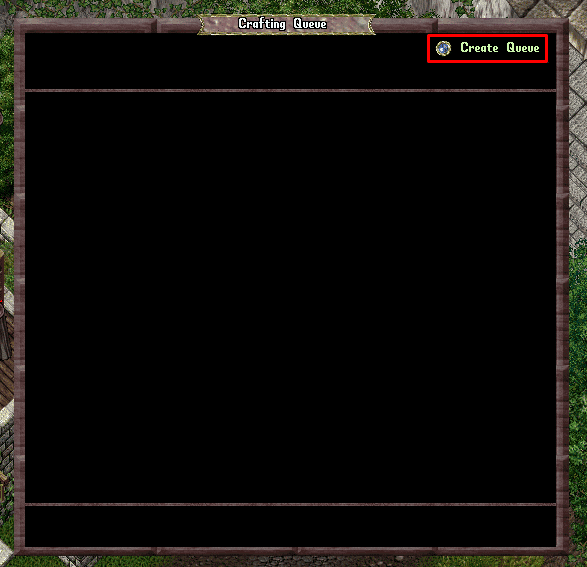
- The Crafting Queue menu is where players create Crafting Queues to automate crafting multiple items, based on various conditions
- Players can click “Create Queue” to create a new Crafting Queue
- Players have the option to give a Crafting Queue a specific name with the Rename Queue button
- Players can delete a Crafting Queue with the Delete Queue button
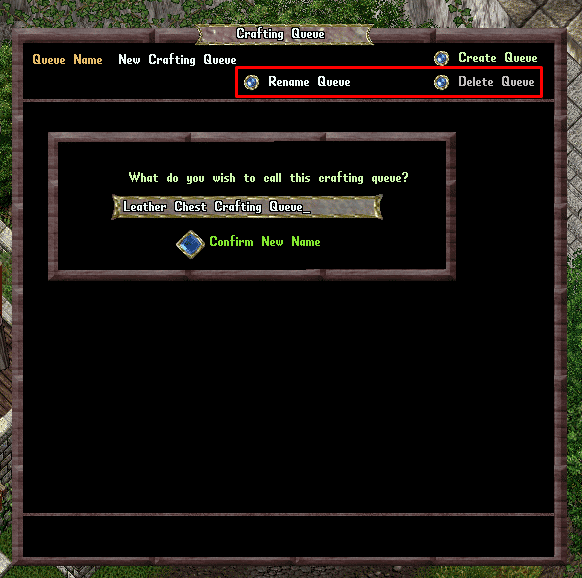
- Players can create up to 10 different Crafting Queues
- Players can navigate between their different Crafting Queues with the Left/Right “Queue” buttons below Queue Name
Adding Items to Queues
- Players can add an item to their currently selected Crafting Queue by clicking the “Add to Queue” button in the crafting sub-menu for the item
- Players are allowed to have items from different crafting skills in the same Crafting Queue (such as Tailoring + Blacksmithing) simultaneously
- Players are allowed to have up to 20 Items in a Crafting Queue
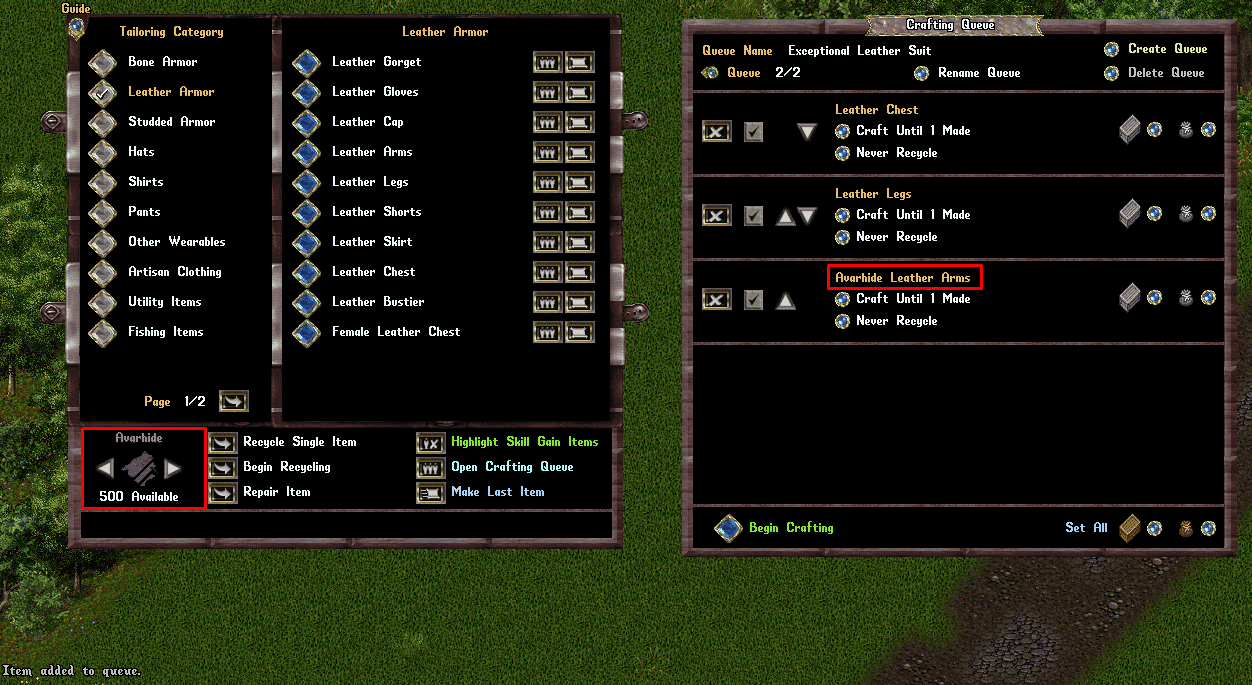
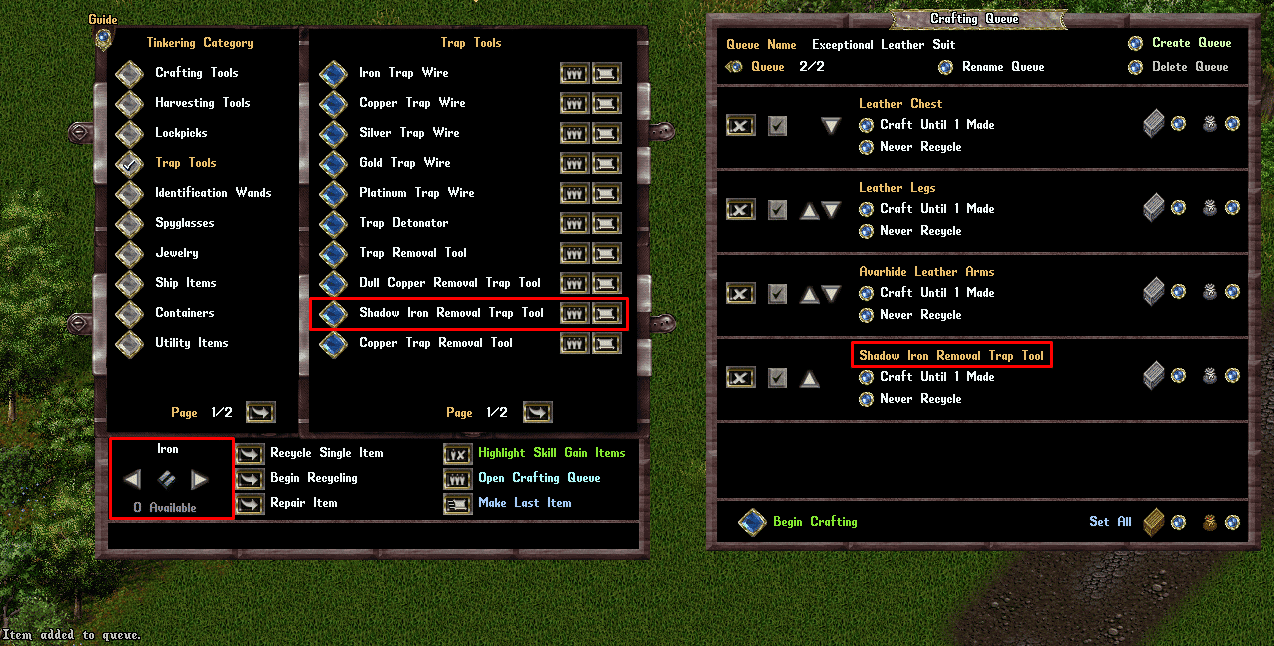
- If a player has a Crafting Queue Menu open, the top level Crafting Menu for an Crafting Item Category will now have individual “Add to Queue” buttons next to each craftable item in that category that players can click to add them to their current Crafting Queue

- Any time a player adds an item to a Crafting Queue, it will use the currently selected Resource Type listed in the bottom left corner of the crafting menu for that item
- It should be noted that some items (including many Tinkering Items) do NOT use the bottom left corner Resource Type selector and will always be made with a specific resource, such as “Shadow Iron Removal Trap Tool” (it will typically include the specific resource needed in the item’s display name in the crafting menu)
Managing Queued Items
Removing an Item
- Players can remove an item from a Crafting Queue by clicking the Remove button on the far left side

Enabling/Disabling an Item
- A checkbox next to each item indicates whether the item is enabled for the Crafting Queue
- If an item is NOT checked, when the Crafting Queue runs, that item will be skipped and it will move onto the next item
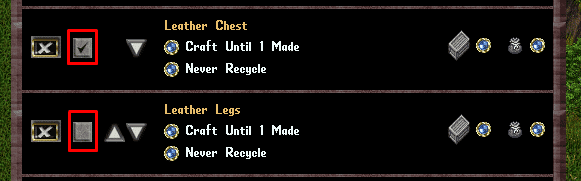
Change the Order of an Item
- Players can change the order of an item in their Crafting Queue by using the Up/Down buttons next to it

Item Conditions
- Clicking the Upper Orb button for an item will open the Item Condition menu which allows the player to select a certain condition that must be reached during the Crafting Queue before it can move onto the next item in the queue
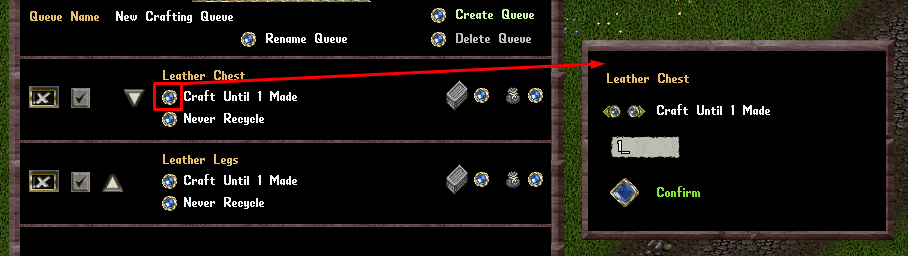
Players can click the Left/Right Arrows in the Item Condition menu to select from the following different conditions for that item:
Craft Until X Made
- The player will keep crafting the item until a total of X items (non-exceptional and exceptional versions) have been made

Craft Until X Exceptional Made
- The player will keep crafting the item until a total of X exceptional versions of the item have been made
- If a player selects this for an item that does not have Exceptional versions possible (such as Aspect Kits or Add-Ons) it will skip the item

Craft Until X Skill Reached
- The player will keep crafting the item until their own crafting skill reaches X (where X is their total skill value, and NOT a skill gain amount since starting crafting)
- If a player has crafting skill below X and skill gain is no longer possible for the player for this item, it will skip the item

Craft Until Resources Empty
- The player will keep crafting the item indefinitely until they run out of the resources needed to craft the item

Changing the Condition Value
- Players can change the X value in the Item Condition menu by typing the desired number into the text box
- Players then click the large Confirm button to confirm their changes and close the menu (or right-click to cancel their change)

Recycle Modes
- Clicking the Lower Orb button for an item rotates between the different Recycle Modes available for it

The following recycle modes are possible:
Never Recycle
- Will not recycle any versions of the item

Recycle Non-Exceptional
- Will recycle non-exceptional versions of the item if possible (Note: Some items are not individually recycleable, such as stackable items like low level scrolls, and the player will likely have to manually recycle them as a stack upon completion of the crafting queue)

Recycle All
- Will recycle any version of the item if possible (Note: Some items are not individually recycleable, such as stackable items like low level scrolls, and the player will likely have to manually recycle them as a stack upon completion of the crafting queue)

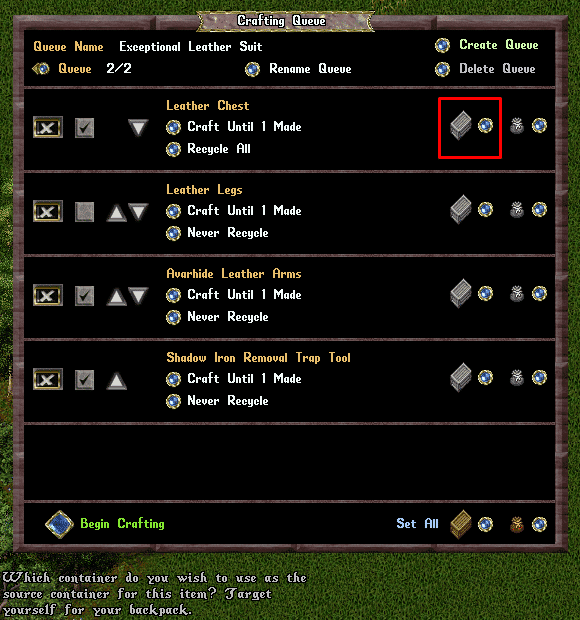
Source Container
- Clicking the Crate button next to an item will allow the player to nominate a Source Container where both Tools and Resources used for crafting that particular item will be pulled from
- If the Crate icon is gray, it indicates the player has not specified a unique Source Container and the player’s backpack will be used for Tools and Resources exclusively
- Players can click the button and target themselves to reset the Source Container back to their own backpack
- Note: When crafting, if the system is unable to find the neccessary Tools or Resources needed for crafting in that unique Source Container (or if the player no longer has access to the container) it will instead default to using the player’s own backpack to find those items
- Players are NOT allowed to use a Storage Shelf or Storage locker as a Source Container
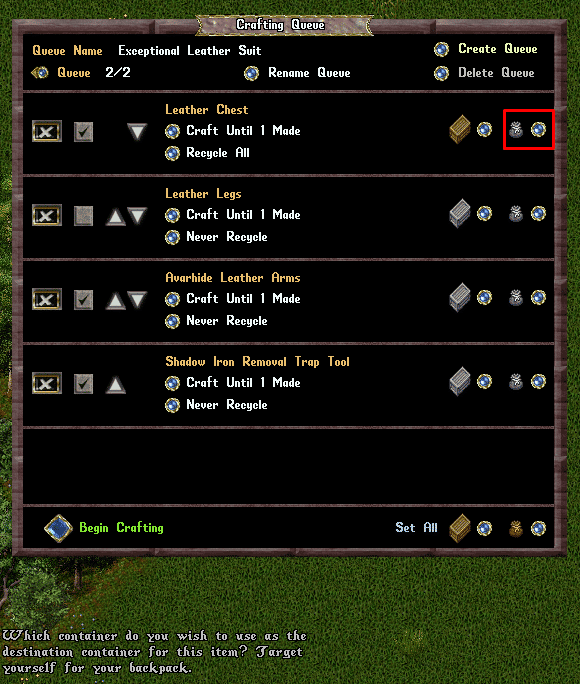
Destination Container
- Clicking the Bag button next to an item will allow the player to nominate a Destination Container where non-recycled crafted items will be placed into
- If the Bag icon is gray, it indicates the player has not specified a unique Destination Container and the player’s backpack will be used to place items into
- Players can click the button and target themselves to reset the Destination Container back to their own backpack
- Note: When crafting, if the Destination Container is no longer available (or the player no longer has access to it) it will instead default to using the player’s own backpack to drop items into
- If the Destination Container cannot hold the resulting crafted item, it will be placed at the player’s feet (similar to normal crafting handling)
- Players are allowed to use a Storage Shelf or Storage locker as a Destination Container, however if the shelf cannot contain that particular item, it will instead be added to the player’s backpack (or ground if backpack is full)
Page Selection
- If a player has more than 5 items in their current Crafting Queue, they can use the Left/Right Page buttons at the bottom of the menu to switch item pages
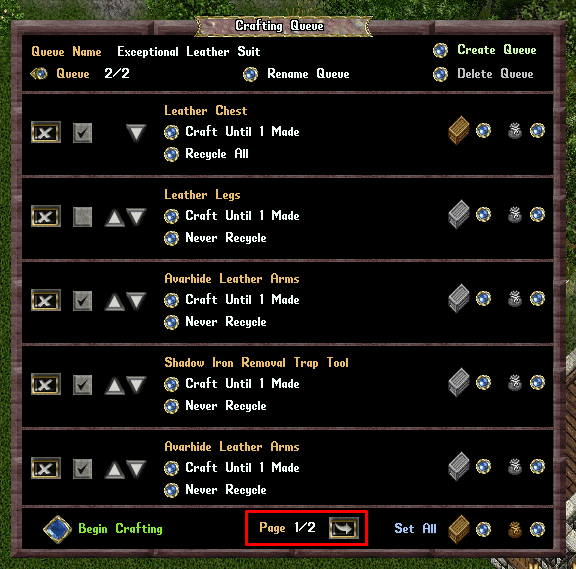
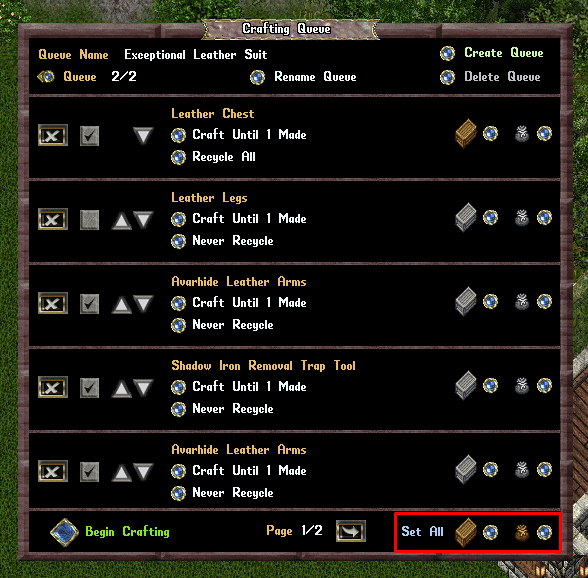
Set All Buttons
- Players can use the Set All buttons at the bottom of the page to set the Source or Destination container for ALL items in their current queue at once
Begin Crafting
- When the player is ready to begin crafting, clicking the Begin Crafting button will start the Crafting Queue for the player
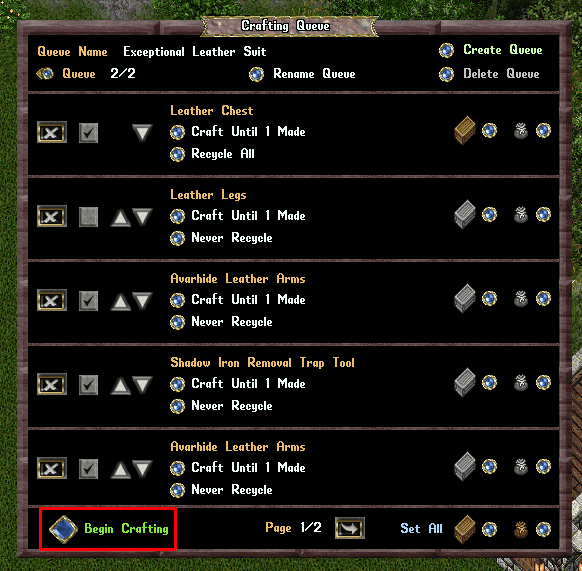
- The Crafting Queue will work from top to bottom, attempting to resolve items in order
- Items that are not enabled (i.e unchecked) will be skipped
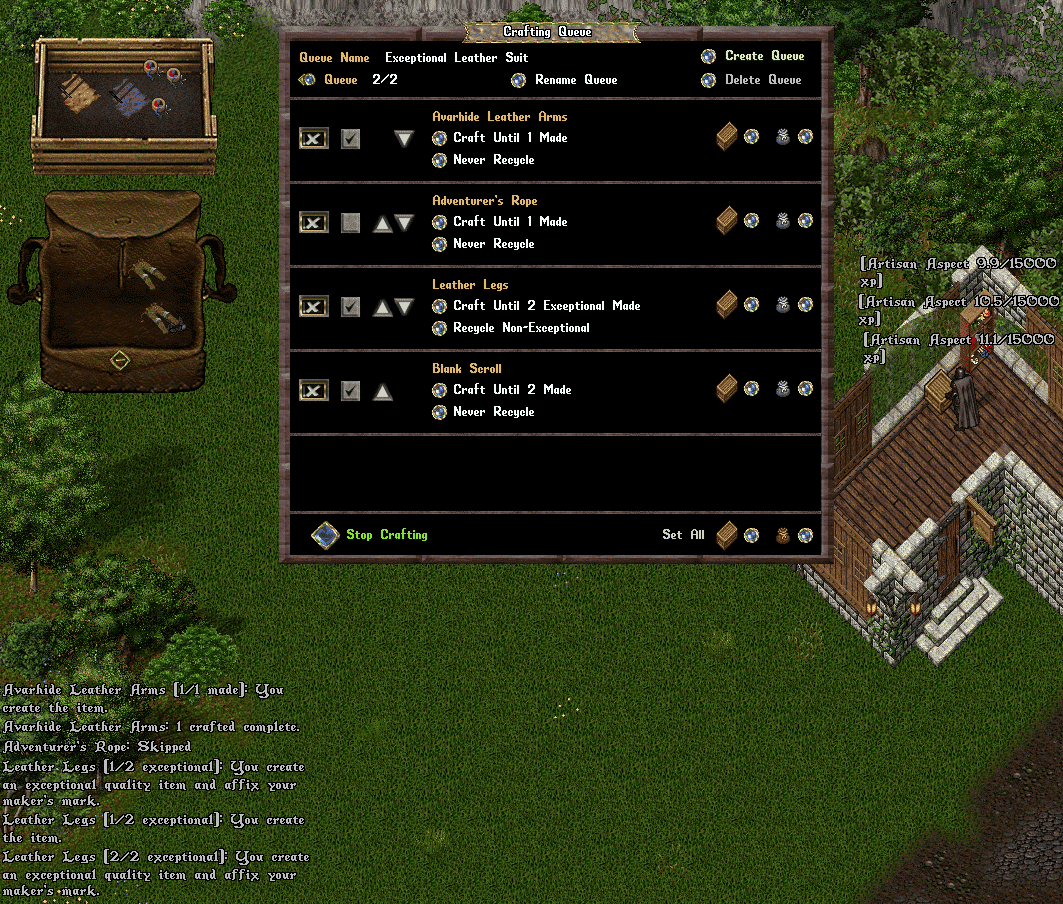
- Each crafting attempt will display a system message explaining the result as well as the current progress on the item (it will always display the current progress even if the item result doesn’t meet the target condition such as being Exceptional or Skill Level Reached)
- If an item cannot be crafted, a system message notification will explain why, and it will move onto the next item in the queue
- Players can click the Stop Crafting button at any time to abandon their current crafting queue run
Other Things of Note
- Once players have Crafting Queues set up with items in them, they don’t need to have the parent Blacksmithing/Tailoring/Alchemy/etc menus open in order to run a Crafting Queue anymore: they can simply just open the Crafting Queue Menu and click the “Begin Crafting” button
- If a player has a Crafting Queue currently running, they will NOT be able to craft an individual items using the normal Craft Menu: they will have to wait for their Crafting Queue to complete or click the Stop Crafting button first
- If a player has a Storage Shelf or Storage Locker set as the Destination Container for a Crafting Queue item, it will only “refresh” the Storage Shelf menu (and numbers displayed in it) when the Crafting Queue completes or is ended (this is intentional and meant to reduce CPU usage and reduce lag for all players, so we ask players to not manually refresh their storage shelf menu after each crafting attempt)
- If a player has not used a specific Crafting Queue in the last 3 months, it will be deleted (this is to prevent “old” crafting queues no longer being used by players taking up memory and increasing our save times)