


PATCH: September 28 – Stygian Rifts Now Live and PvP Events Overhaul
09 / 29 / 2020Stygian Rifts
Introduction
We have decided that Castle Sieges will be replaced in the PvP rotational schedule with Stygian Rifts
A lot of different factors played into this decision, but ultimately the biggest one was that Stygian Rifts fills a gap in our rotational schedule that was missing for small-group, instanced PvP for players to compete on the same footing against equal-sized groups in a controlled environment
Overview
Stygian Rifts is now a rotational PvP event, meaning a new event will occur every 4 hours, in the same hourly schedule currently consisting of Town Struggles, Corpse Creek Contests, and Dungeon Flashpoints
While an individual Stygian Rifts event is broken down into multiple phases (including multiple “matches” taking place among different teams of players simultaneously), we will refer a single Stygian Rifts event as the entire block of time allocated in the PvP event schedule for the event as a whole
In order for a player to participate in a Stygian Rift event they must be in a Guild, must have “Participate in PvP Events” enabled in their guild settings, and also be in a Party of exactly 3 players (they do not all have to be in the same guild, however)
A single Stygian Rifts event is broken down into two phases: Rift Nodes and Rift Matches
Rift Nodes Phase
The Rift Nodes Phase lasts until either of the following occur:
- 15 minutes has passed
- 8 total Rift Teams have been formed and are now fighting in Rift Matches
Rift Zones
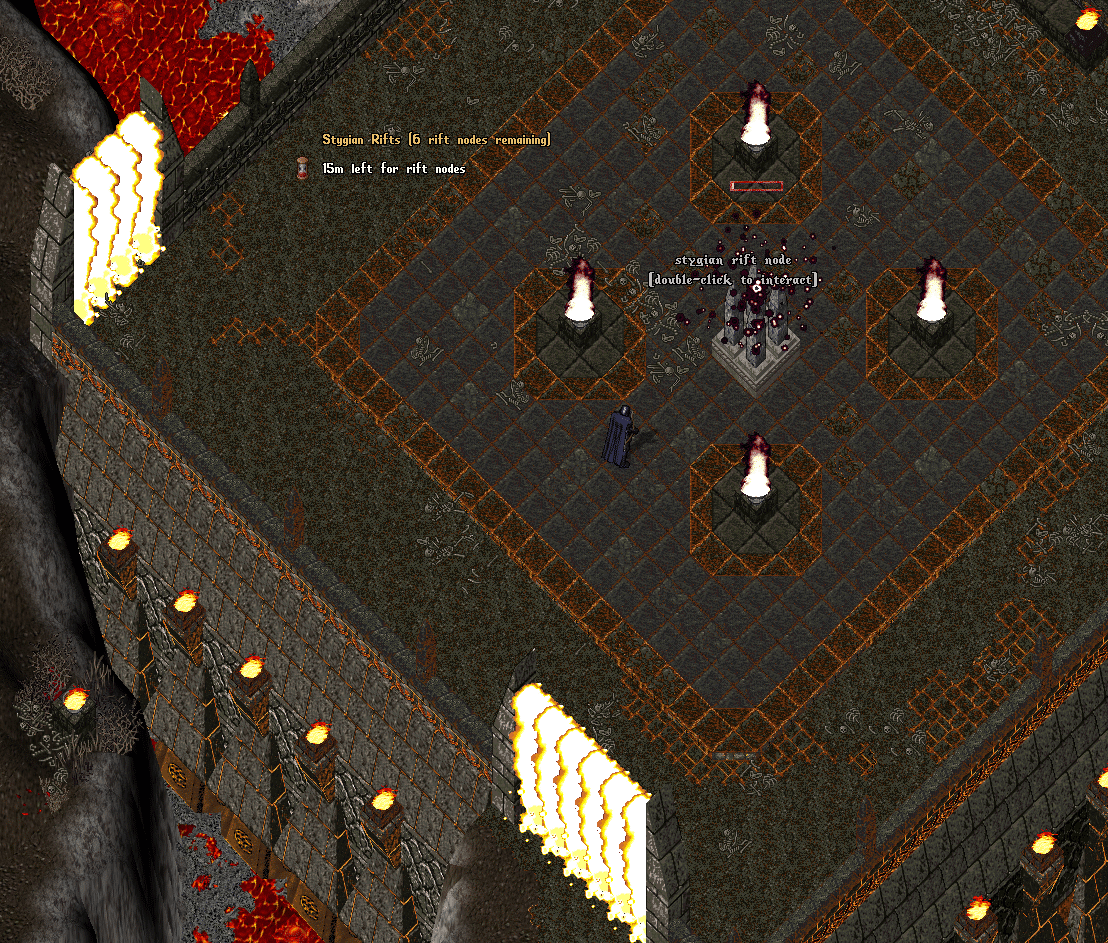
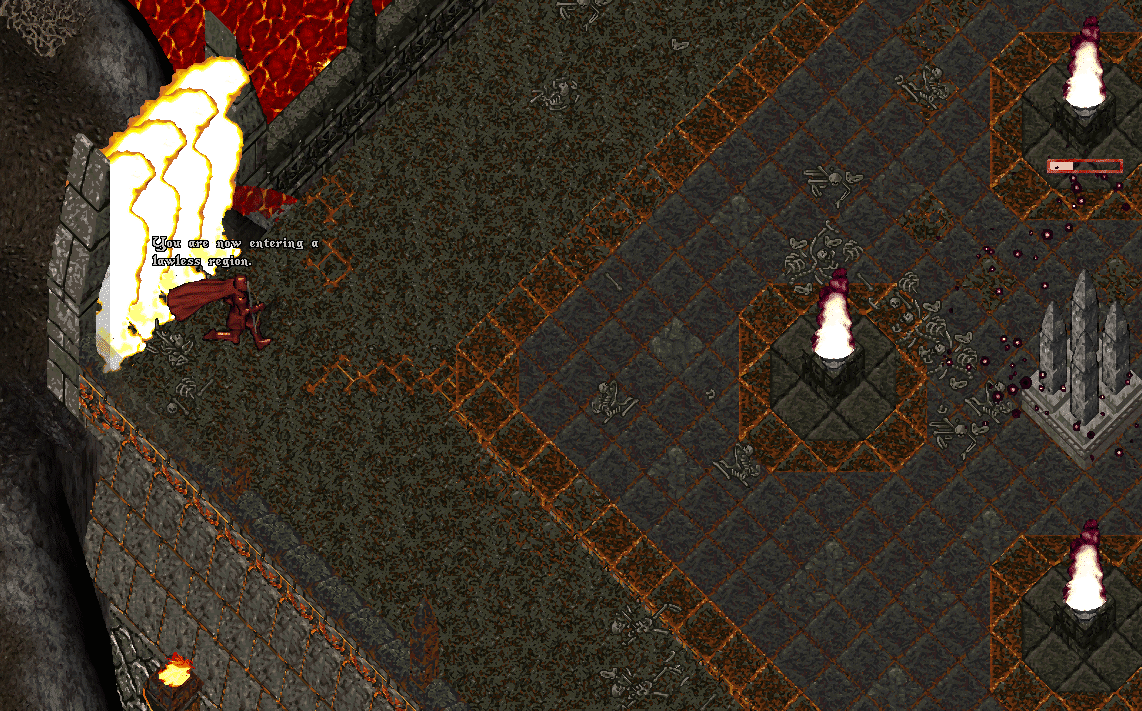
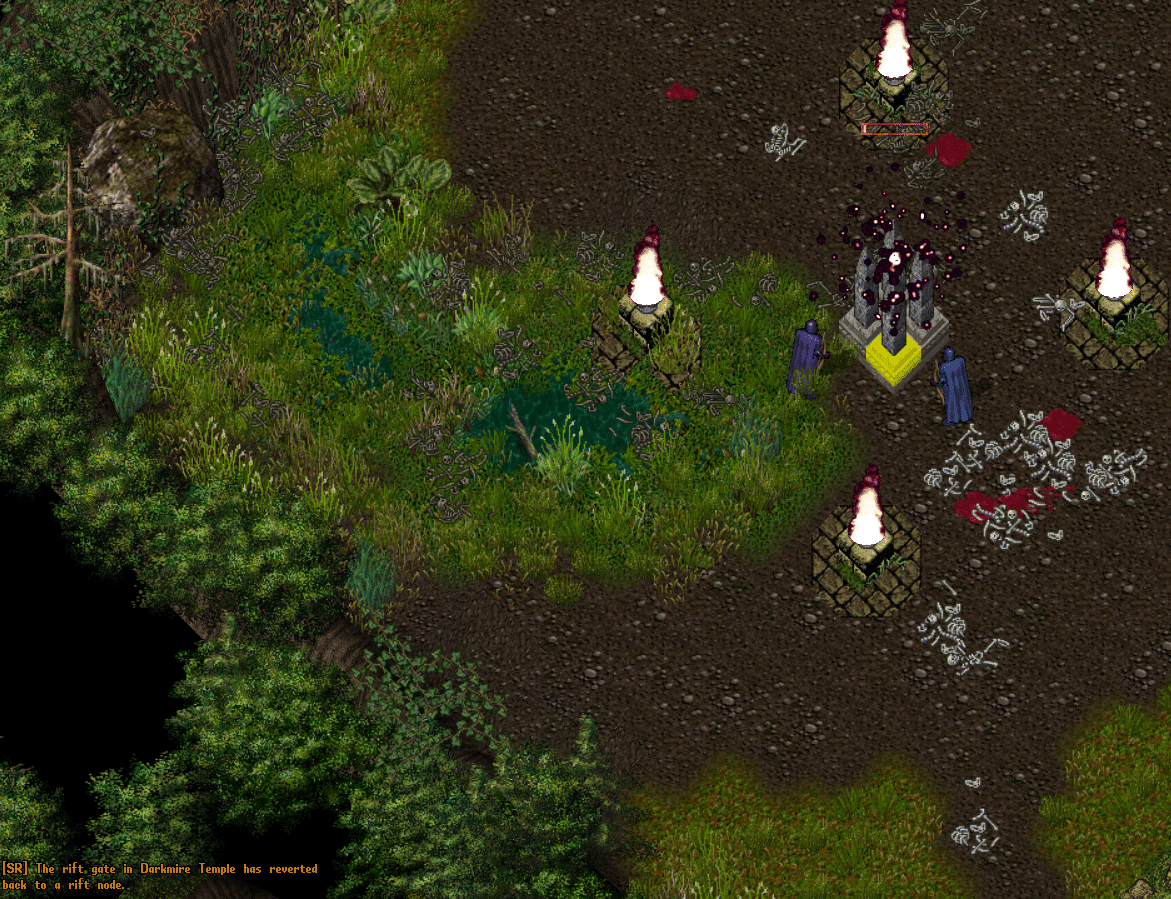
As soon as a Stygian Rifts event starts, Stygian Rift Zones activate within each of our 9 dungeons at preset locations
Stygian Rift Zones, while active, are Grey Zones (Lawless), meaning that all players will flag as Grey to each other inside and may freely perform hostile actions against each other within the zone
Murderers will not suffer resurrection penalties if they die inside as Rift Zone while it is active
Tamed or Summoned creatures will only deal 1 damage to players inside of an active Rift Zone
Entrances to Rift Zones are marked with large golden flame animations, and players will be notified with overhead text when they enter or leave the region
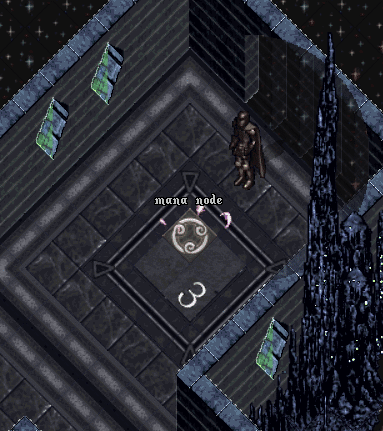
Rift Nodes
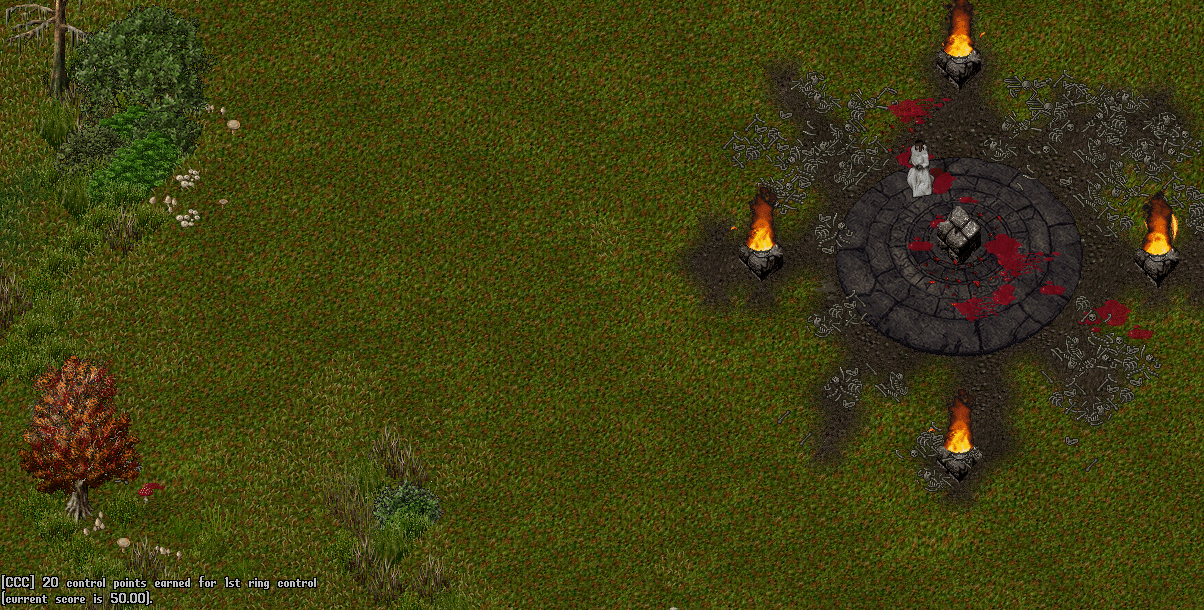
In the center of each dungeon’s Rift Zone, players will find a Rift Node formation, which is depicted by a collection of large standing stones, a progress bar, and an animated effect
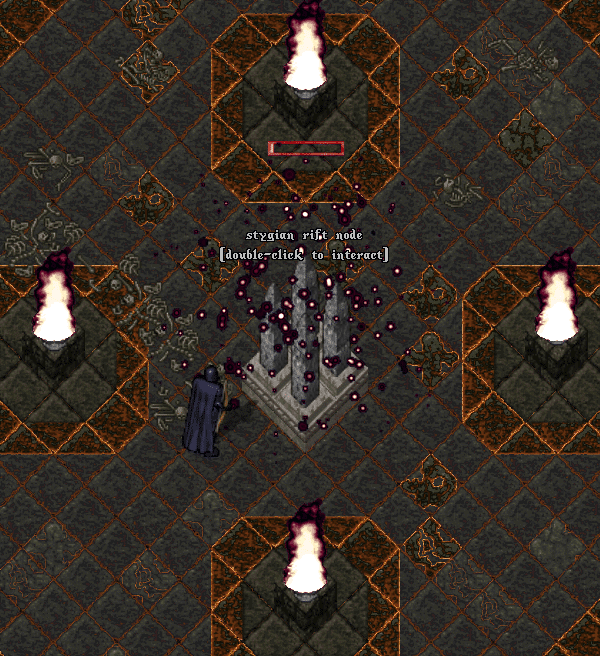
If a player is in a Guild, has “Participate in PvP Events” in their guild settings enabled, and are in a Party of exactly 3 players, they can double-click any piece of a Rift Node to interact with it
Interacting with a Stygian Rift node will Damage the player for 5-10 damage (ignoring armor), but increase overall Progress on the Rift Node by an equal amount
Players can interact with a Stygian Rift node once every 5 seconds, and will automatically continue to interact with the node every 5 seconds, so long as the player stays within range of it
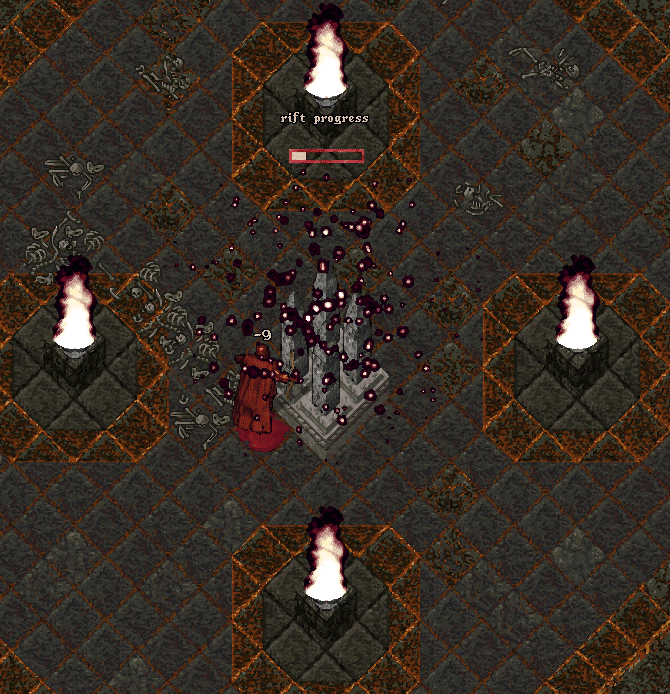
Once 250 total points of Progress has been cumulatively made by all players towards an individual Rift Node, it will shatter and reveal a Rift Gate
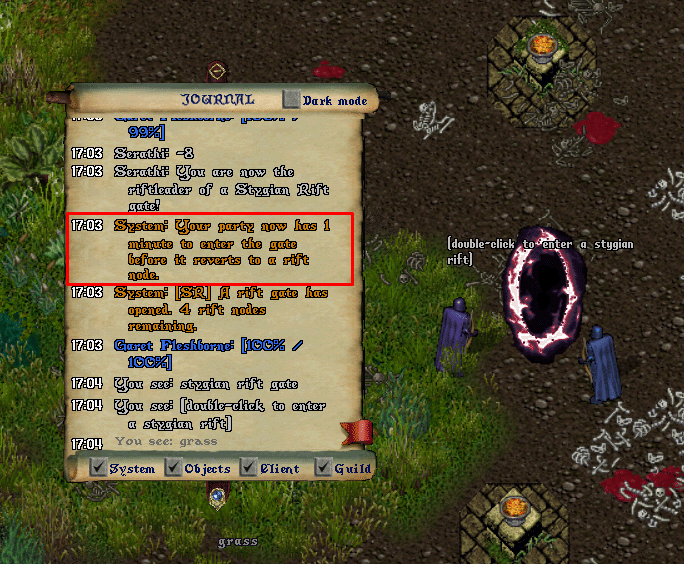
Whichever individual player did the most total Progress (i.e. took the most Damage from the Rift Node) towards the Rift Node will become what is known as a Riftleader for the resulting Rift Gate and their Party will earn the rights to be a team for a Stygian Rifts Match
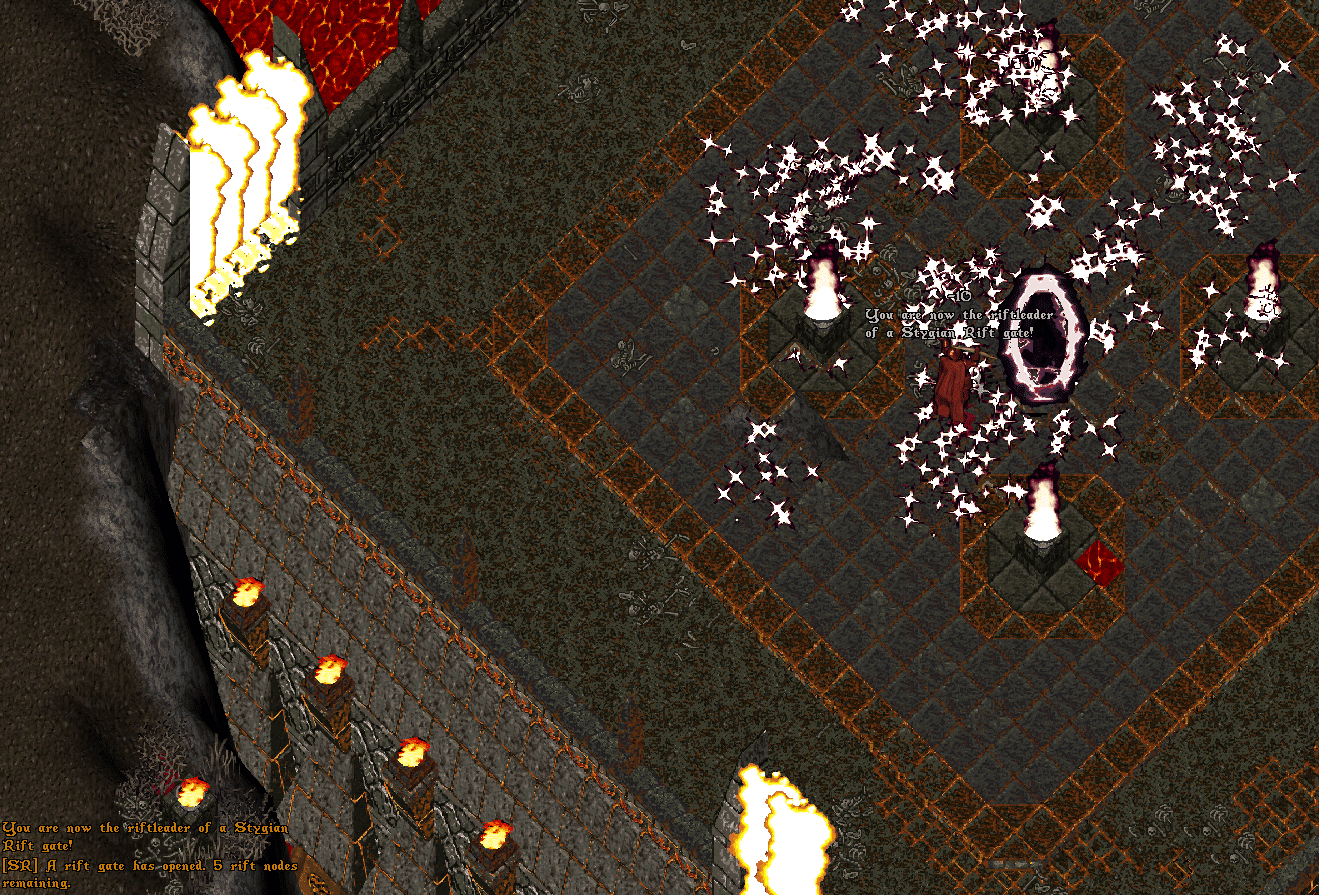
Riftleaders and Rift Gates
Rift Gates are only visible to and only usable by the Riftleader and their Party
Any member of the party can walk over or double-click the Rift Gate to receive a menu allowing them to enter the gate
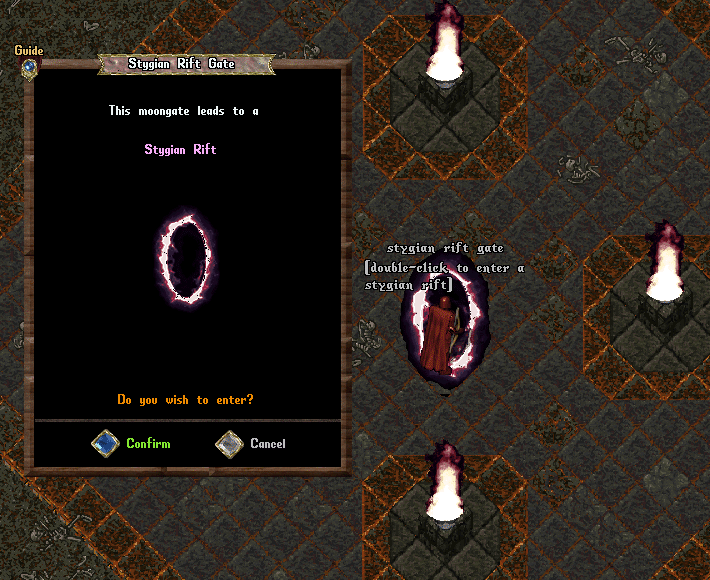
However, as soon as the Rift Gate appears, the Riftleader and their party will only have 1 minute to enter the gate with all 3 members of their party nearby (they do not all need to be alive, just in the Stygian Rift Zone area)
Once their party enters the gate, the gate will close and they will not be able to enter it again
Announcements and Notifications
Each time a Rift Gate is opened, an announcement will go out letting players know how many potential Rift Nodes/Gates (out of 8 total) there are remaining, reflecting how many “teams” potentially can still be formed for Stygian Matches
Additionally, both the [BattleHotbar and [Battle page will also display how many Rift Gates, i.e. “team slots” are remaining in the event as well
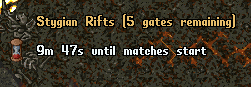
Rift Node Reversion
If 1 minute passes and the Riftleader and their party does not enter their Rift Gate, it will revert back to a Rift Node and will be announced to the entire server, allowing players to compete again over the Rift Node
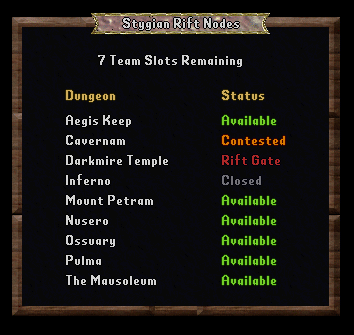
Stygian Rift Nodes Menu
Players can click the “Dungeons” button in the [Battlebar or the “Open Menu” button next to Stygian Rifts in the Battle page of the Guild Menu to launch a Stygian Rift Nodes menu that shows the status of all Rift Nodes in each dungeon
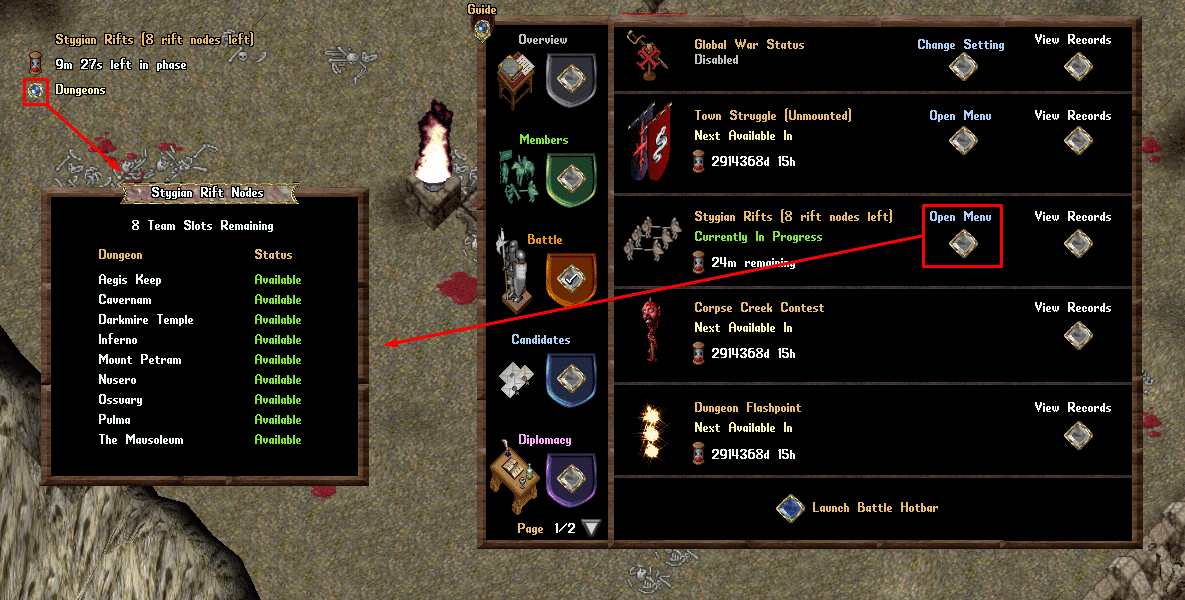
The Stygian Dungeons Menu shows the status of all Rift Nodes in every dungeon as well as how many “Team Slots” are left remaining in the event
Statuses for Rift Nodes in dungeons are as follows:
Available: Indicates no progress has been made on the Rift Node so far
Contested: Some progress has been made on the Rift Node by one or more parties
Rift Gate: A party has won this Rift Node, but has not yet gone in the gate (it will revert to a Rift Node if 60 seconds pass without them entering the gate)
Closed: The party that won this Rift Node has gone in the gate and the gate is now closed
Rift Cells
Once a party enters a Rift Gate, all members will be transported to a Rift Cell, where they will wait for matchmaking to occur
Each Rift Cell has a Banker that players may use to restock, and a Exit Moongate they may use to leave the event in the case of an emergency, and a Respawn Brazier that will be used during matches for players to respawn
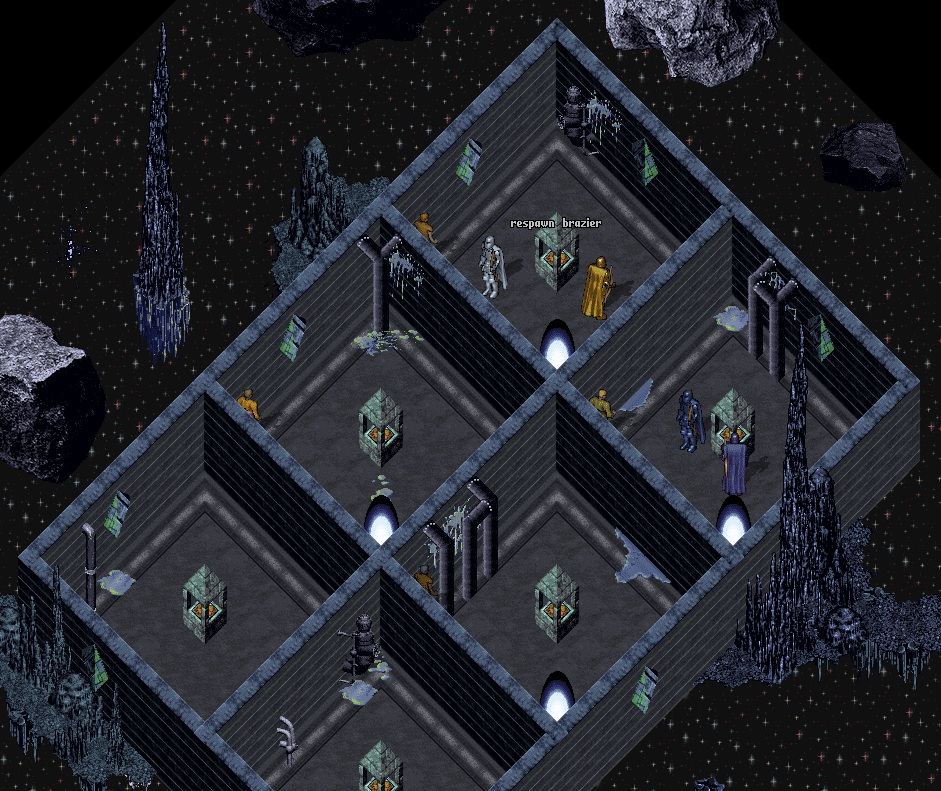
Warning: If players chose to to use the Exit Moongate to exit the Rift Cells area, they will forfeit participation in the Match and will NOT be able to rejoin the event
Players who use an Exit Moongate will be teleported to the Arena

Matchmaking
Every 5 minutes during the Rift Nodes phase, the system will attempt to perform matchmaking and pair “Ready” teams of a similar ELO Rating against each other for a Rift Match
Each player has an individual ELO Rating that represents their cumulative Win/Tie/Loss history relative to the opponents they face
Players can view their own ELO Rating in the Battle Records page of the Guild Battle Menu by clicking hte “View Records” button
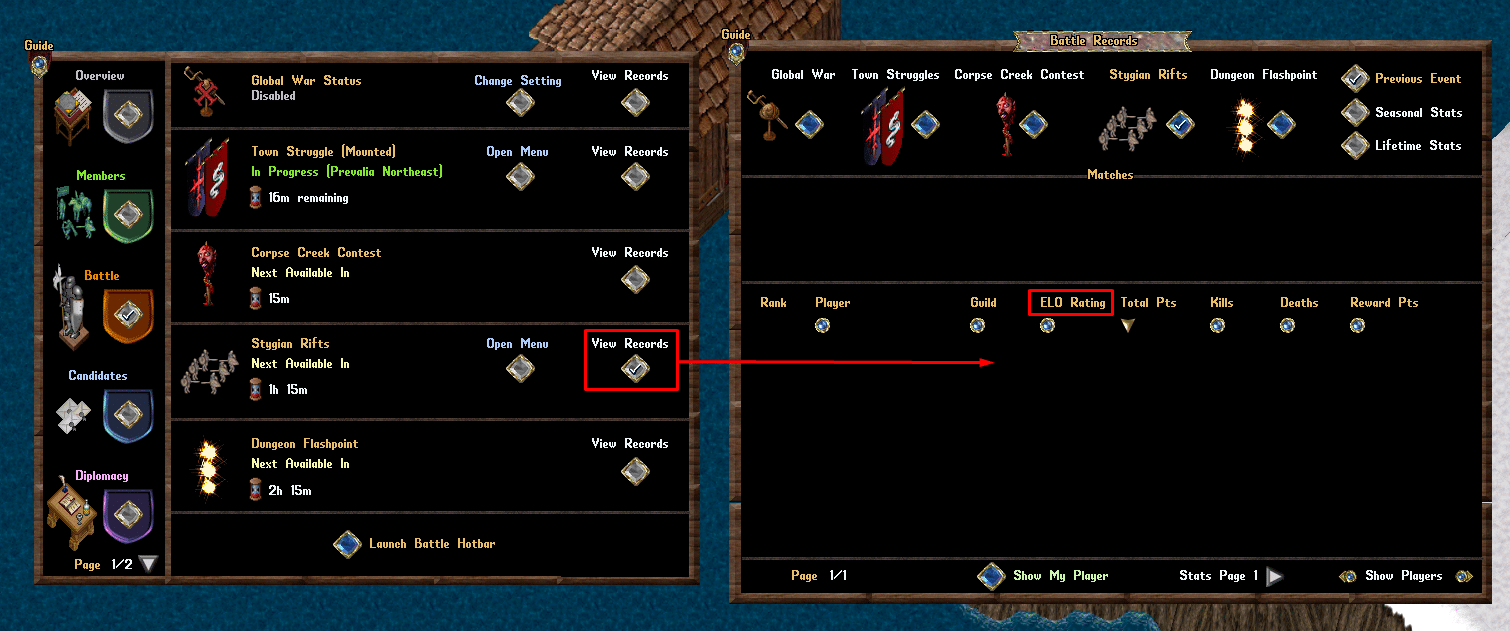
Each team has a derived ELO Rating, which is based on the average of the ELO Scores of all of its players
In order for a team to be considered Ready for matchmaking, all players on the team must first meet the following Match Restrictions:
Match Restrictions
- They must be inside the Rift Cells area
- They must be in a party of 3 Players
- They must be in a Guild and have “Participate in PvP Events” enabled in their guild settings
- They must be alive
- They must be online
- They cannot have any Followers or Mounts active in the game world
- They cannot be Disguised
- They cannot be Incognito
- They cannot be Polymorphed
Teams will not be considered Ready for Matchmaking if they have arrived in their cell within the last 15 seconds (this is to ensure teams have at least a short period to restock from the banker before being thrust into a match). This 15 second delay is ignored, however, for the last Matchmaking attempt that occurs at the expiration of the Rift Node phase (15 minutes duration)
During Matchmaking, any Ready teams will first be randomly paired up with any other Ready teams that have an ELO score within 250 points of each other Afterwards, any remaining Ready teams will be randomly paired with each other regardless of ELO differecne
By default teams will NOT match up with each other if there is a common Guild shared between players on both teams UNLESS time is about to expire in the Rift Nodes phase (15 minute duration) and they are the only possible matchup. Guilds that field multiple teams may potentially have to wait longer than normal in some instances to find a valid opponent
Additionally, on the last Matchmaking attempt at the expiration of the Rift Node phase (15 minutes duration), if a team has any players that are Not Online or Outside of the Rift Cells Area, those restrictions will be waived and matchmaking will still occur, and that team will simply have to compete with less than 3 players
Rift Nodes Phase Completion
Once 15 minutes have passed since the start of the Stygian Rifts events, any Rift Gates or Rift Nodes still in the game world will automatically be removed
and any players waiting in the Rift Cells area for an opposing team will be ejected to the Arena
Effectively, players have a maximum of 15 minutes to find themselves inside of a Rifts Match otherwise will be left out
Rift Matches
Rift Matches for players will last 15 minutes, regardless of when they were started
At the start of each match, opposing teams will be placed in rooms on opposite sides of the Rift Arena
Mechanics
Internal mechanics for players inside Stygian Matches are fairly standard for both PvP and PvM, with a few exceptions:
- Players will always be treated as being “Recently in PvP” throughout the entirety of a Stygian Match (meaning they will not receive Aspect or Mastery Chain bonuses to damage against creatures nor trigger Aspect Weapon/Spellbook Specials against them)
- Players will not be able to cast any Summon spells or the Invisibility spell while inside a Rift Match
- Players will not be able to use the Hiding or Stealing skills while inside a Rift Match
Scoring
Individual Scoring
Players will want to increase their Individual Score as much as possible during a Stygian Rifts event, because their final individual score compared to other players in their patch will determine many Guild Reward Points and Battle Commendations they earn as rewards for the event
Player Kills
When a player is killed, members of the opposing team will each earn (100 x Damage %) points for their individual score, where Damage % is how much of the total player damage dealt against that killed player came from them (i.e. a player doing 81% of the damage towards another player will yield 81 points when they die)
Additionally, the player who did the highest total Damage % will be credited with the Kill for the purposes of stats tracking
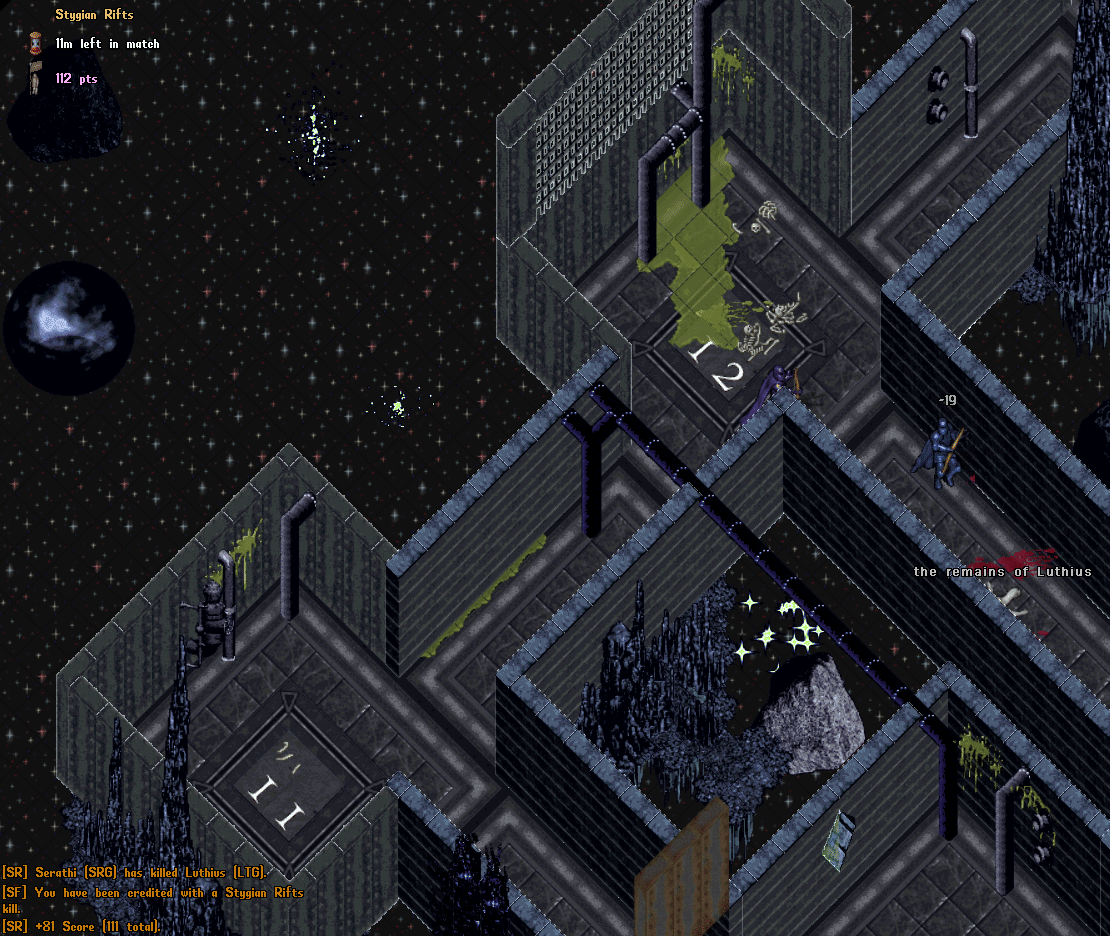
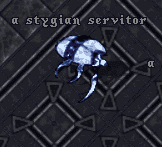
Stygian Servitors
Every 60 seconds, a Stygian Servitor will spawn in the arena if one does not currently exist
Anytime a player damages a Stygian Servitor, they will earn ((Damage Amount / Creature Max Hit Points) * 200) points towards their Individual Score
Team Scoring
Each team will also have a Team Score, which is the combined total of all Individual Scores of each member of their team
Whichever team ends the Rift Match with the highest Team Score will win the match
While players are rewarded with Guild Reward Points and Battle Commendations based on their individual scores, any Guild that has a member whose team wins a Rift Match will earn 3 Guild Prestige, and any Guild that has a member whose team loses a Rift Match will earn 1 Guild Prestige (guilds can only earn a max of 3 Guild Prestige from any one Stygian Event though)
Additionally, the result of the match (Win/Tie/Loss) will affect the ELO Rating of all members of each team (with ELO Ratings changing more depending on the difference in ELO Ratings of each team)
Player Death
When players die during a Rifts Match, they will be teleported back to the Rift Cells area and resurrected with full Health, Stamina, and Mana
Once 30 seconds have passed, players will be able to use the Respawn Brazier in the center of their cell to choose a Respawn location and rejoin the match
During this 30 second downtime, players should take advantage of the Banker in the Rift Cells area to restock any needed items (such as Cure Potions / Trap Pouches / etc)
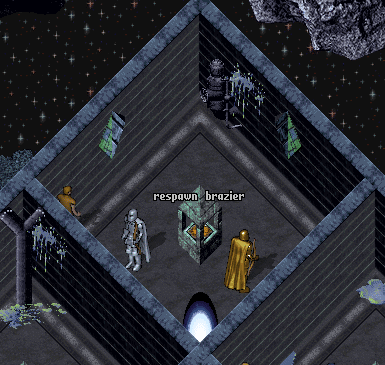
Once 30 seconds have passed, players can double-click the Respawn Brazier to launch a map of the Rift Arena and click any button depicting a room on the map to teleport to that room of the Rift Arena
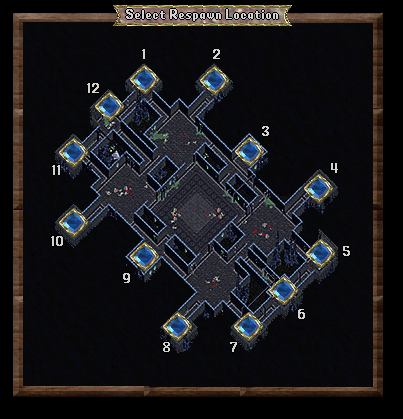
Strategically, players who die should coordinate with their team to choose a respawn location where they can re-enter the fray with the least amount of resistance possible (i.e. the living players should probably retreat to that location to meet the respawning player and reform their team)
Stygian Rifts Equipment Handling (From General Changes Forum Post)
For both Town Struggle and Stygian Rift events, handling for equipment, looting, and item consumptions are as follows:
Item Consumption
- Players will not consume Reagents, Bandages, Arrows/Bolts, Refresh Potions while participating in Town Struggles and Stygian Rifts
- Every player gets one free Cure Potion consumption every 30 seconds
Looting / Death
- All equipped and backpack items on a player will be treated as Blessed and stay with them on death UNLESS they are Magical or Crafted with a Colored Material
- Poisoned weapons will lose any poison charges on death (poisoners should bring Poison potions with them in their pack to repoison weapons post-spawn)
Doorways
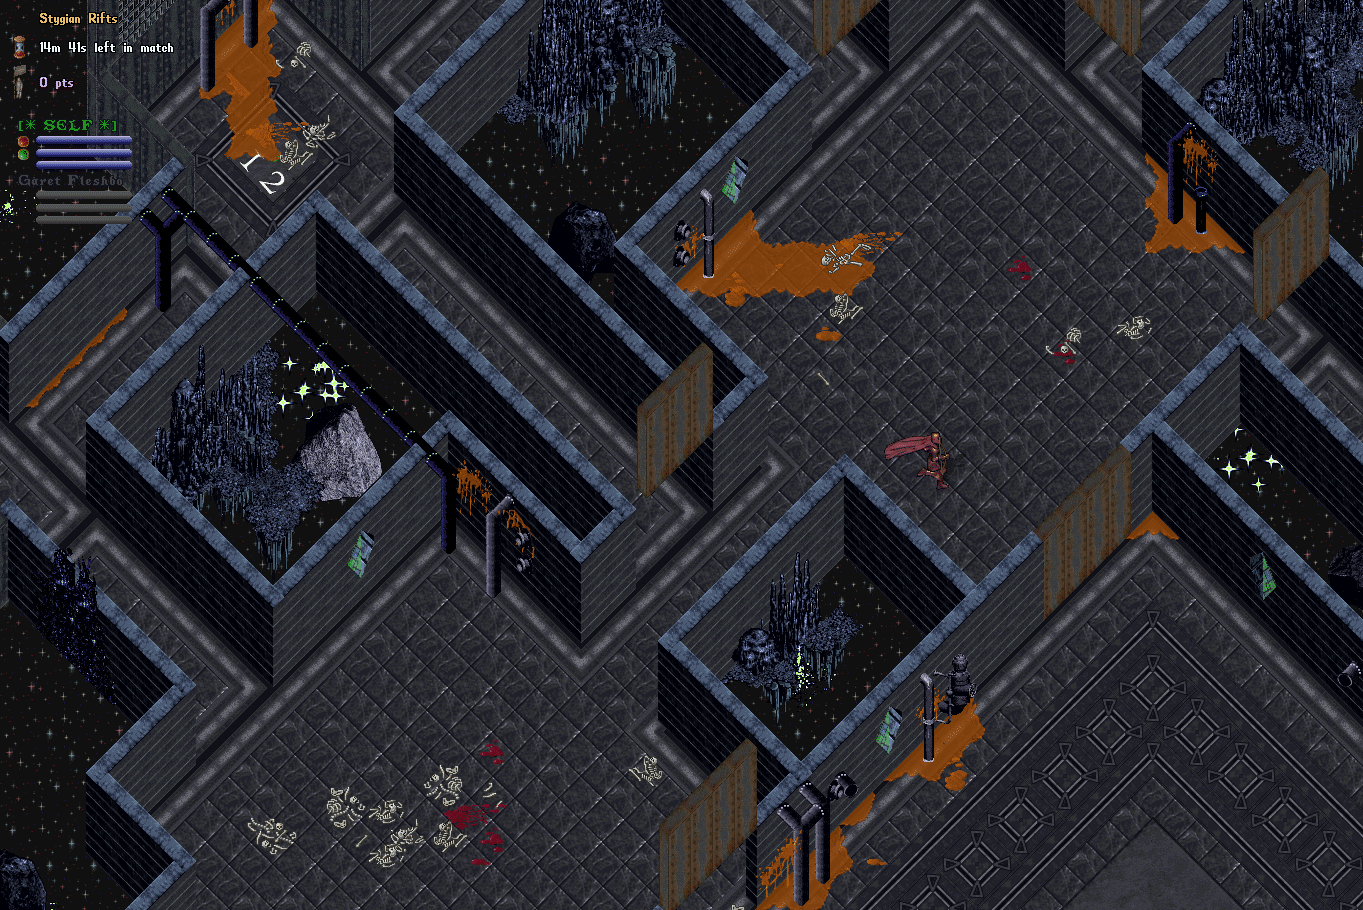
Each Stygian Arena is seperated by a large number of Doorways, which are impassable when lowered
Every 5 seconds, 20% of the currently raised Doorways will lower themselves, and 80% of the currently lowered Doorways will be raised, resulting in a constantly shifting battlefield
Additionally, players who are standing in the location of a Doorway that is attempting to lower itself will continously take a large amount of damage until they move out of the way
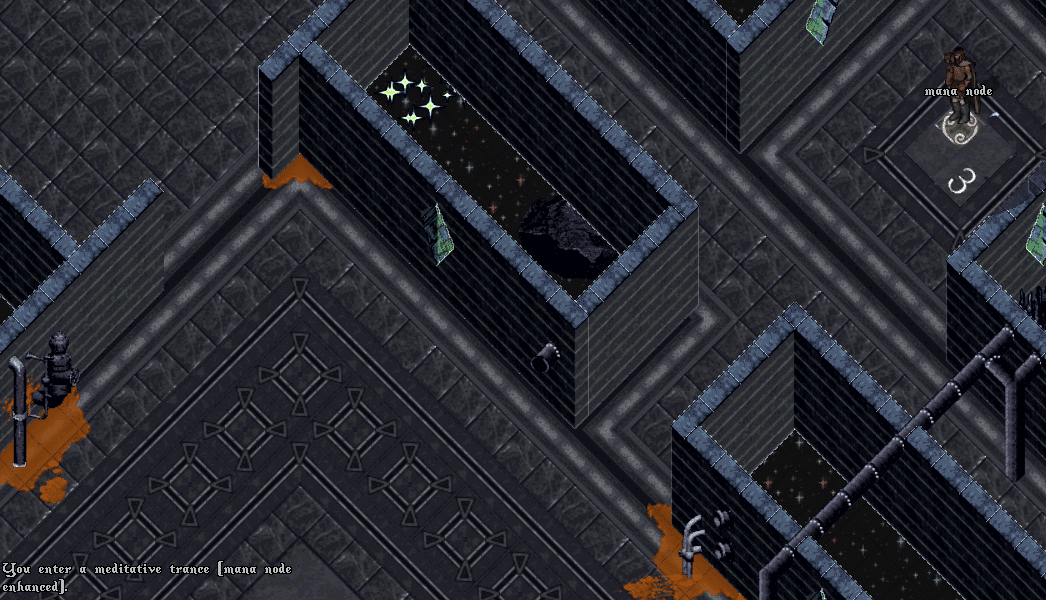
Mana Nodes
Inside of each Respawn Room players will find a Mana Node
If a player stands on a Mana Node and actively Meditates (using the Meditation skill) they will receive double the normal amount of mana restored, so long they are not interrupted
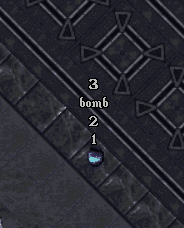
Traps
Stygian Arenas are deadly locations, and throughout every Rift Match a continuing wave of different traps will appear for players to navigate around and avoid taking damage from

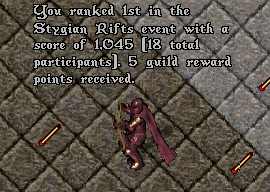
Stygian Rifts Event Completion
Because there will be up to 4 different matches ongoing simultaneously, the Stygian Rift event itself is not considered completed until all matches have been completed
Once all matches have been resolved, players will be ranked from highest to lowest in terms of Individual Score and rewards will be distributed to players
ELO Rating
Additionally, the result of each player’s match (Win, Tie, Loss) will recalculate that player’s ELO Rating based on the initial ELO Rating for the opposing team
Exiting
At the end of the each Match, all players in the match will be ejected to the Arena
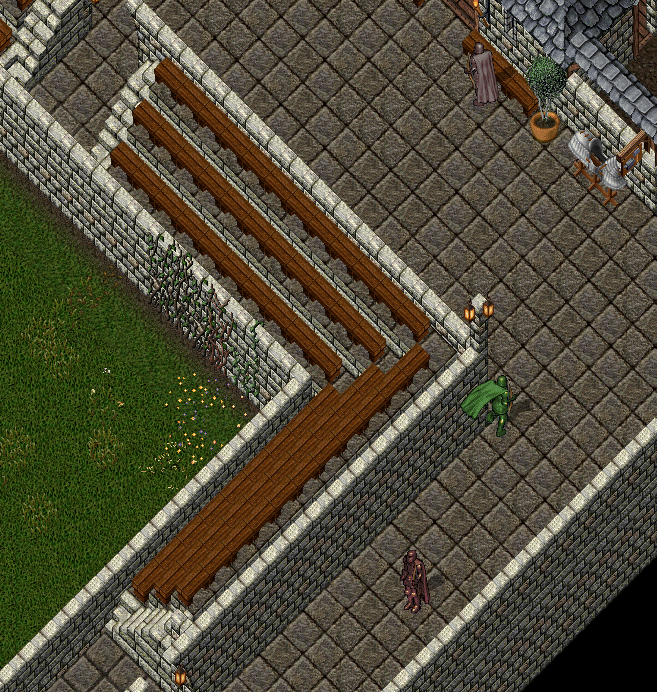
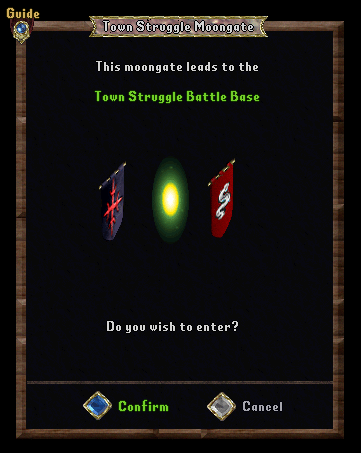
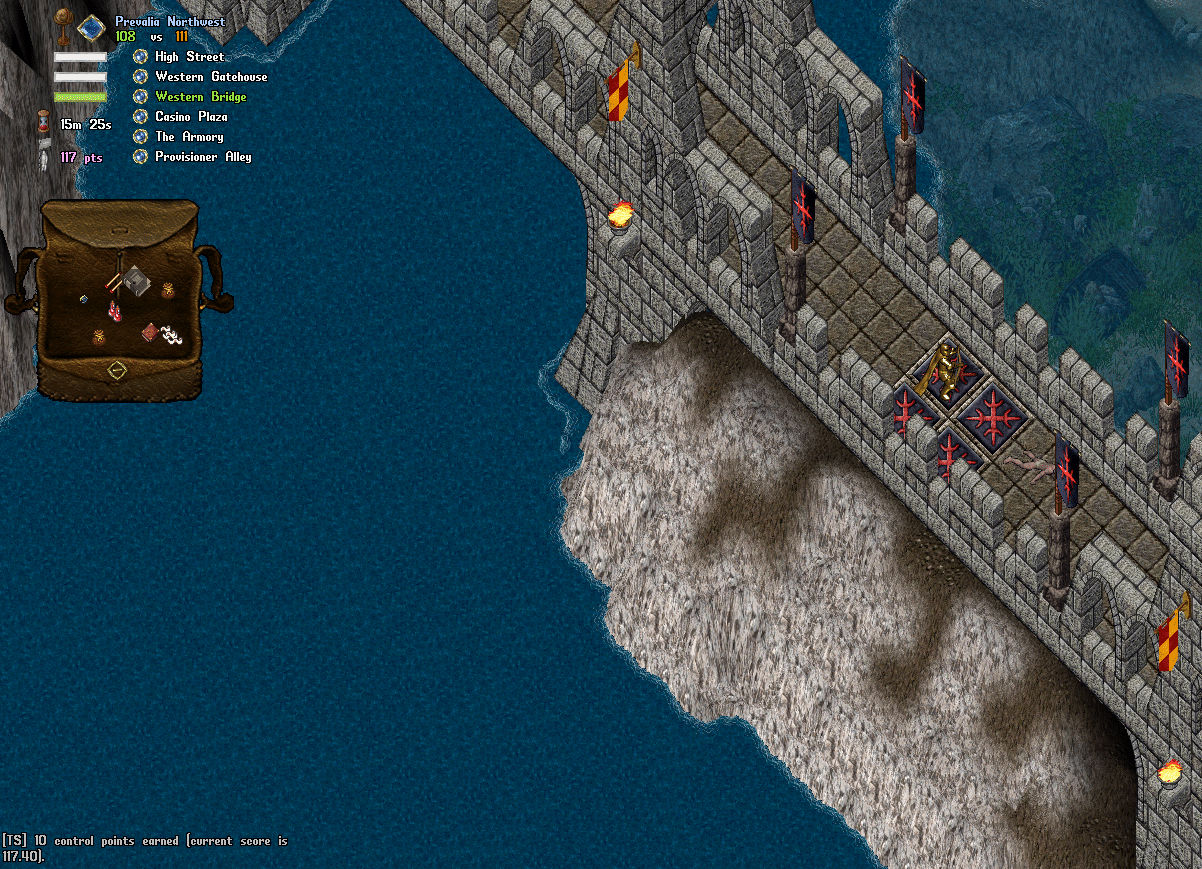
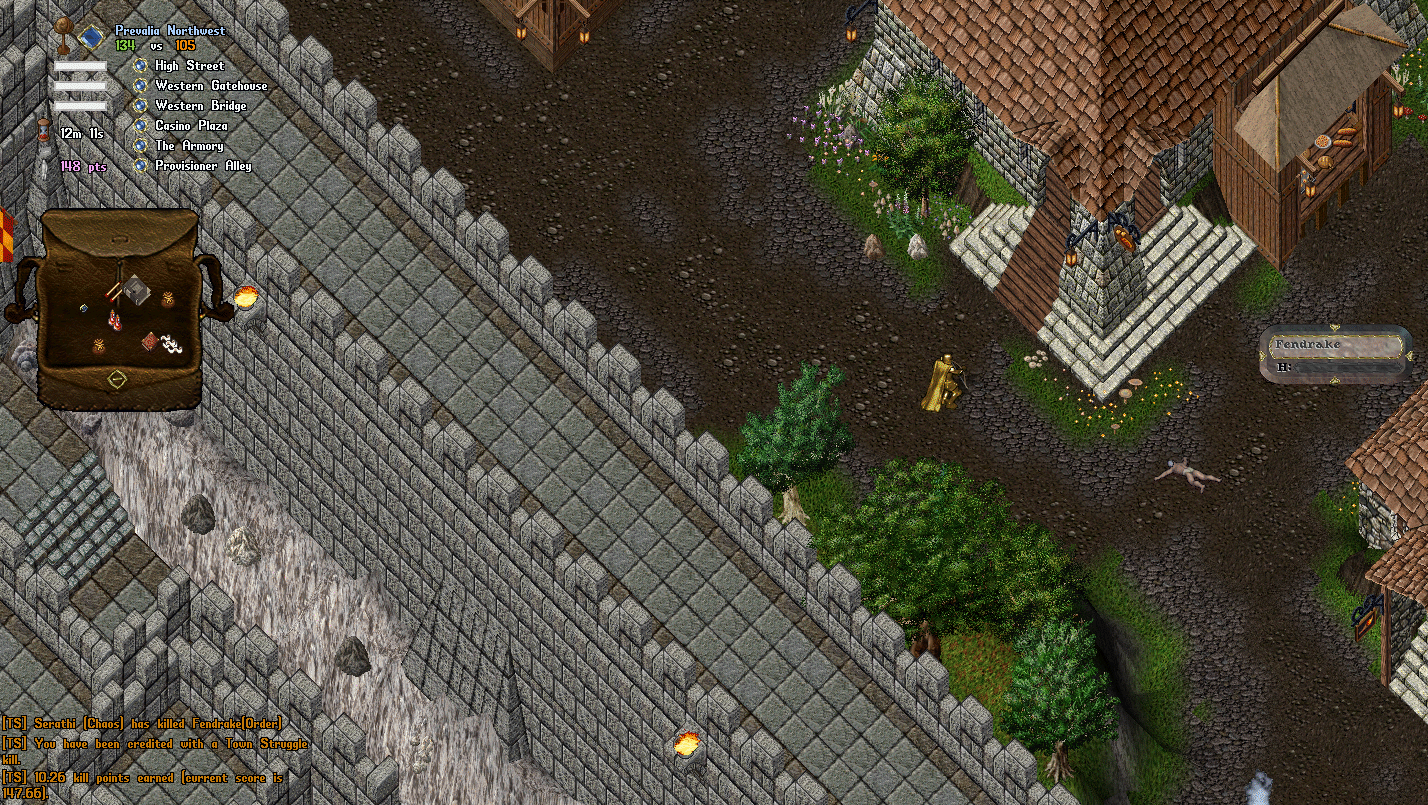
Town Struggles
Event Participation
We have renamed Faction Moongates that appear in towns to “Battle Gates”
We also will refer to Faction Bases as “Battle Bases”
In order to participate in a Town Struggle, players MUST go into a green “Battle Gate” and be present inside the Battle Base at the moment the event starts; players who do not do this, will not be able to participate in the event
Idle Players
During a Town Struggle event, if a player spends more than a cumulative total of 10 minutes either outside of the Event Zone or inside the Town Struggle Base (but not waiting for their Respawn timer to finish):
- They will be kicked from the event
- They will have their current event scores and stats wiped
- They will be prevented from doing Town Struggles or any other PvP event for the next 48 hours
Town Struggle Equipment Handling (From General Changes Forum Post)
For both Town Struggle and Stygian Rift events, handling for equipment, looting, and item consumptions are as follows:
Item Consumption
- Players will not consume Reagents, Bandages, Arrows/Bolts, Refresh Potions while participating in Town Struggles and Stygian Rifts
- Every player gets one free Cure Potion consumption every 30 seconds
Looting / Death
- All equipped and backpack items on a player will be treated as Blessed and stay with them on death UNLESS they are Magical or Crafted with a Colored Material
- Poisoned weapons will lose any poison charges on death (poisoners should bring Poison potions with them in their pack to repoison weapons post-spawn)
Scoring
Control Zones
If a Control Zone only contains members of one Faction, that Faction is considered to Control it
Every 10 seconds, a score check will occur in each of the three Control Zones in the event
During this score check, for each Control Zone that is Controlled by a Faction
- That Faction will earn 10 Points towards their Team Score
- Each individual Faction Member inside that zone will earn 10 Points towards their Individual Score
Notably, we no longer have “Overhead Progressbars” for the Control Zones and the flags for each zone no longer raise / lower over time; they simply switch during each score check to reflect which Faction is currently in control of the zone (or revert to neutral flags/tiles if no one controls it)
Once a player has spent a cumulative total of 60 seconds within a specific Control Zone, they will no longer count as a valid player towards controlling that zone and cannot earn any further Team Score or Individual Score points from it; they must move and occupy a different Control Zone to further score in this manner

Kills
Whenever a player is killed by a different team, the player who dealt the highest damage total to the deceased player is considered the Killing Player, and the following occurs:
Team Score
The Killing Player’s team steals 5% of the deceased player’s Team Score and transfers it to their own team’s Team Score
Individual Score
10% of the deceased player’s Individual Score is divided up and transferred amongst players who contributed damage to the kill, with points amounts based on damage % dealt
For instance, Player A has an individual score of 100 Points and is killed:
Player A loses (10% x 100) = 10 Points from their individual score
Player B did 60% of the damage to Player A, so they receive (10 x 60%) = 6 Points added to their individual score
Player C did 30% of the damage to Player A, so they receive (10 x 30%) = 3 Points added to their individual score
Player D did 10% of the damage to the Player A, so they receive (10 x 10%) = 1 Points added to their individual score
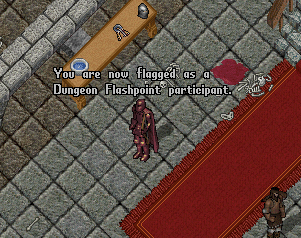
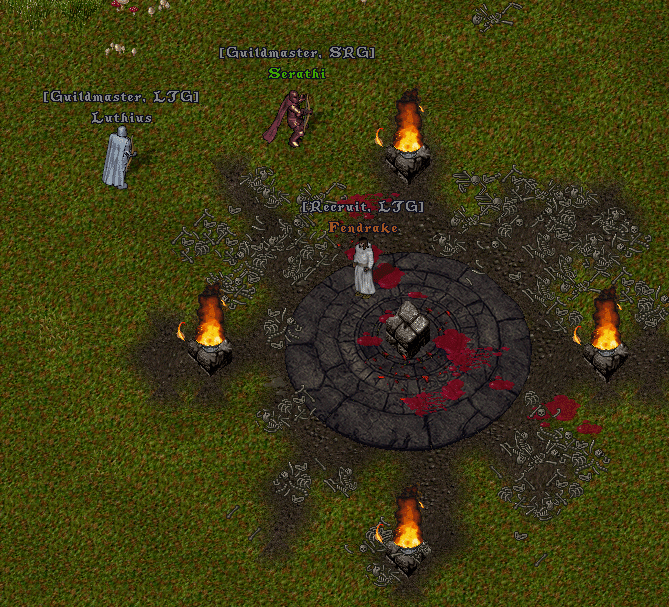
Dungeon Flashpoints
Event Region
The Event Region for Dungeon Flashpoints is now exclusively the entire Level 1 of the respective dungeon
Ossuary is the sole exception to this, where Ossuary’s Event Region includes both Level 1 and Level 2 of the dungeon (since Level 1 is tiny)
Players will become Dungeon Flashpoint participants the moment they are alive and enter the Level 1 of the respective Dungeon (and have “Participate in PvP Events” toggled ON in their Guild menu settings)
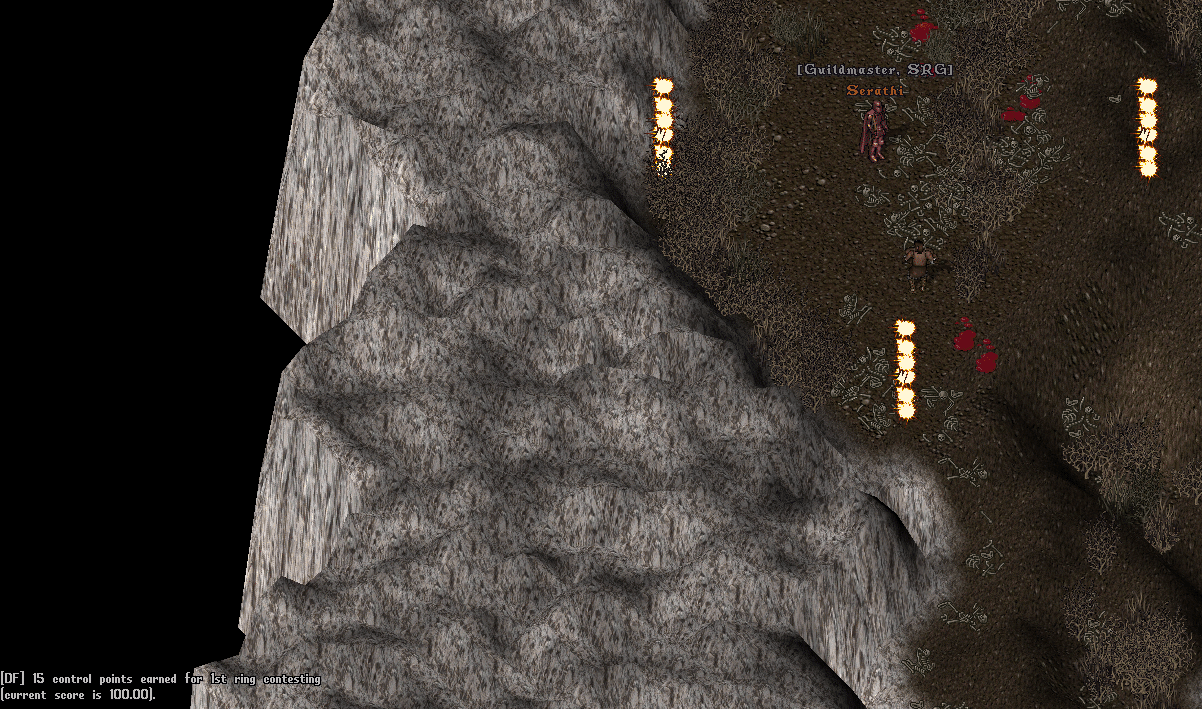
Scoring
Rings of Control
Each Dungeon Flashpoint has three “Rings of Control” that are used to determine points earned by Guilds and Players
1st Ring (Most Valuable): Area directly inside of the Control Zone for the event
2nd Ring (Average): Any area not inside the Control Zone, but still within 40 tiles (roughly 2 screens) of the center of the Control Zone
3rd Ring (Least Valuable): Any remaining area inside the Event Region, but not inside the 1st Ring or 2nd Ring
Score Checks
Every 30 seconds, a Score Check will occur, which will determine increases for the Team Score of guilds and the Individual Score of players:
Team Score
Guilds earn points for their Team Score based on the most valuable Ring they currently Control or are Contesting (guilds will only earn points for a single ring during a Score Check)
If the 1st ring contains only members of a single guild, that guild is considered to Control it
If the 1st ring contains members of two or more different guilds, each of those guilds are considered to be Contesting it
If the 2nd ring contains any members of a guild, that guild is always considered to be Contesting it
If the 3rd ring contains any members of a guild, that guild is always considered to be Contesting it
1st Ring Control: Increases Team Score by 20 Points
1st Ring Contesting: Increases Team Score by 15 Points
2nd Ring Contesting: Increases Team Score by 15 Points
3rd Ring Contesting: Increases Team Score by 10 Points
Individual Score
Players increase their Individual Score during score checks based on the Ring that they individually occupy (players will only earn points for a single ring during a score check)
If the player is in the 1st ring and only members from their guild are also inside, the player is considered to Control it
If the player is in the 1st ring and there are members of other guilds also inside, the player is considered to be Contesting it
If the player is in the 2nd ring, they are always considered to be Contesting it
If the player is in the 3rd ring, they are always considered to be Contesting it
1st Ring Control: Increases Individual Score by 20 Points
1st Ring Contesting: Increases Individual Score by 15 Points
2nd Ring Contesting: Increases Individual Score by 15 Points
3rd Ring Contesting: Increases Individual Score by 10 Points
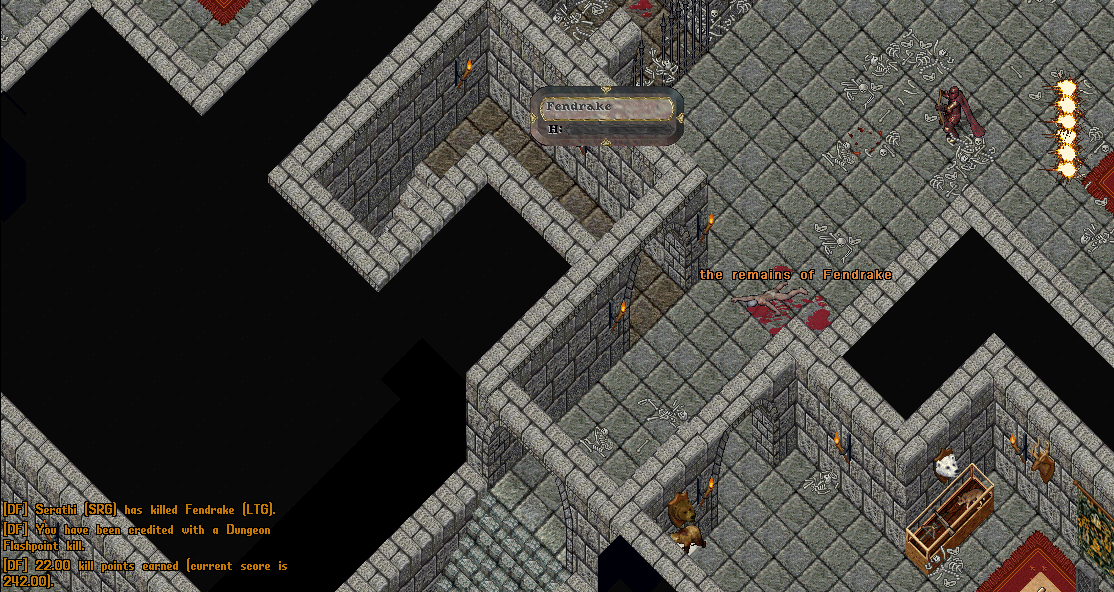
Kills
Whenever a player is killed by a different team, the player who dealt the highest damage total to the deceased player is considered the Killing Player, and the following occurs:
Team Score
The Killing Player’s team steals 5% of the deceased player’s Team Score and transfers it to their own team’s Team Score
Individual Score
10% of the deceased player’s Individual score is divided up and transferred amongst players who contributed damage to the kill, with points amounts based on damage % dealt
For instance, Player A has an individual score of 100 Points and is killed:
Player A loses (10% x 100) = 10 Points from their individual score
Player B did 60% of the damage to Player A, so they receive (10 x 60%) = 6 Points added to their individual score
Player C did 30% of the damage to Player A, so they receive (10 x 30%) = 3 Points added to their individual score
Player D did 10% of the damage to the Player A, so they receive (10 x 10%) = 1 Points added to their individual score
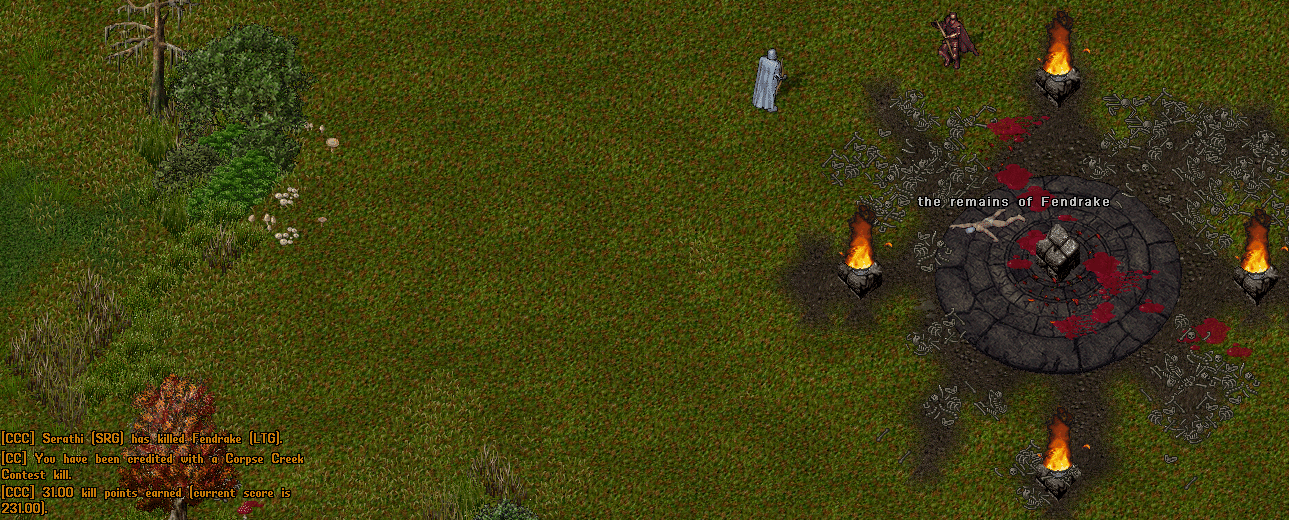
Corpse Creek Contests
Event Region
The Event Region for a Corpse Creek Contest includes the entire Corpse Creek Region (grey zone)
Flagging
Any player who is a participant in the Corpse Creek Contest will either flag as Green (same guild) or Orange (enemy guild) to other event participants, with all other non-participating players in the Corpse Creek region displaying as grey to them (even in the same guild or enemy guilds)
Scoring
Rings of Control
Each Corpse Creek Contest has three “Rings of Control”
1st Ring: Area directly inside of the Control Zone for the event
2nd Ring: Any area not inside the Control Zone, but still within 40 tiles (roughly 2 screens) of the center of the Control Zone
3rd Ring: Any remaining area inside the Event Region, but not inside the 1st Ring or 2nd Ring
Score Checks
Every 30 seconds, a Score Check will occur, which will determine increases for the Team Score of guilds and the Individual Score of players:
Team Score
Guilds earn points for their Team Score based on the most valuable Ring they currently Control or are Contesting (guilds will only earn points for a single ring during a Score Check)
If the 1st ring contains only members of a single guild, that guild is considered to Control it
If the 1st ring contains members of two or more different guilds, each of those guilds are considered to be Contesting it
If the 2nd ring contains any members of a guild, that guild is always considered to be Contesting it
If the 3rd ring contains any members of a guild, that guild is always considered to be Contesting it
1st Ring Control: Increases Team Score by 20 Points
1st Ring Contesting: Increases Team Score by 15 Points
2nd Ring Contesting: Increases Team Score by 15 Points
3rd Ring Contesting: Increases Team Score by 10 Points
Individual Score
Players increase their Individual Score during score checks based on the Ring that they individually occupy (players will only earn points for a single ring during a score check)
If the player is in the 1st ring and only members from their guild are also inside, the player is considered to Control it
If the player is in the 1st ring and there are members of other guilds also inside, the player is considered to be Contesting it
If the player is in the 2nd ring, they are always considered to be Contesting it
If the player is in the 3rd ring, they are always considered to be Contesting it
1st Ring Control: Increases Individual Score by 20 Points
1st Ring Contesting: Increases Individual Score by 15 Points
2nd Ring Contesting: Increases Individual Score by 15 Points
3rd Ring Contesting: Increases Individual Score by 10 Points
Kills
Whenever a player is killed by a different team, the player who dealt the highest damage total to the deceased player is considered the Killing Player, and the following occurs:
Team Score
The Killing Player’s team steals 5% of the deceased player’s Team Score and transfers it to their own team’s Team Score
Individual Score
10% of the deceased player’s Individual score is divided up and transferred amongst players who contributed damage to the kill, with points amounts based on damage % dealt
For instance, Player A has an individual score of 100 Points and is killed:
Player A loses (10% x 100) = 10 Points from their individual score
Player B did 60% of the damage to Player A, so they receive (10 x 60%) = 6 Points added to their individual score
Player C did 30% of the damage to Player A, so they receive (10 x 30%) = 3 Points added to their individual score
Player D did 10% of the damage to the Player A, so they receive (10 x 10%) = 1 Points added to their individual score